SoftEXIT CRM Getting Started
Your step-by-step guide to managing companies, contacts, opportunities, activities, tasks, customer cases, dashboards, and day-to-day CRM work.
Welcome to SoftEXIT CRM
SoftEXIT CRM brings together companies, contacts, sales opportunities, activities, tasks, customer cases, and reporting in a single application. Its screens are powered by SoftEXIT Studio, but day-to-day CRM users generally work from the Views area rather than the application-building editors.
This guide walks through the exact screens in the accompanying screenshots. What you can view or edit depends on your organization’s configuration and assigned access permissions.
A practical first-day workflow
- Open the CRM Solution and review the Dashboard.
- Find a company and open its related Contacts and Opportunities.
- Create or update an Activity and a follow-up Task.
- Track an Opportunity as it moves through sales stages.
- Explore the My CRM Data screens and the Customer Support workspace.
Navigate the CRM Workspace
After signing in, check the Solution name in the header. Use Switch Solution to select CRM when necessary. The top navigation groups business screens under menus such as CRM, My CRM Data, and Customer Support. Each group has tabs for individual screens; use More Views or the tab overflow controls to find additional Views.
The left sidebar may display administrative or Studio configuration tools. Everyday CRM work typically happens through the business tabs such as All Companies, All Contacts, All Opportunities, All Activities, and All Tasks.
Understand the common controls
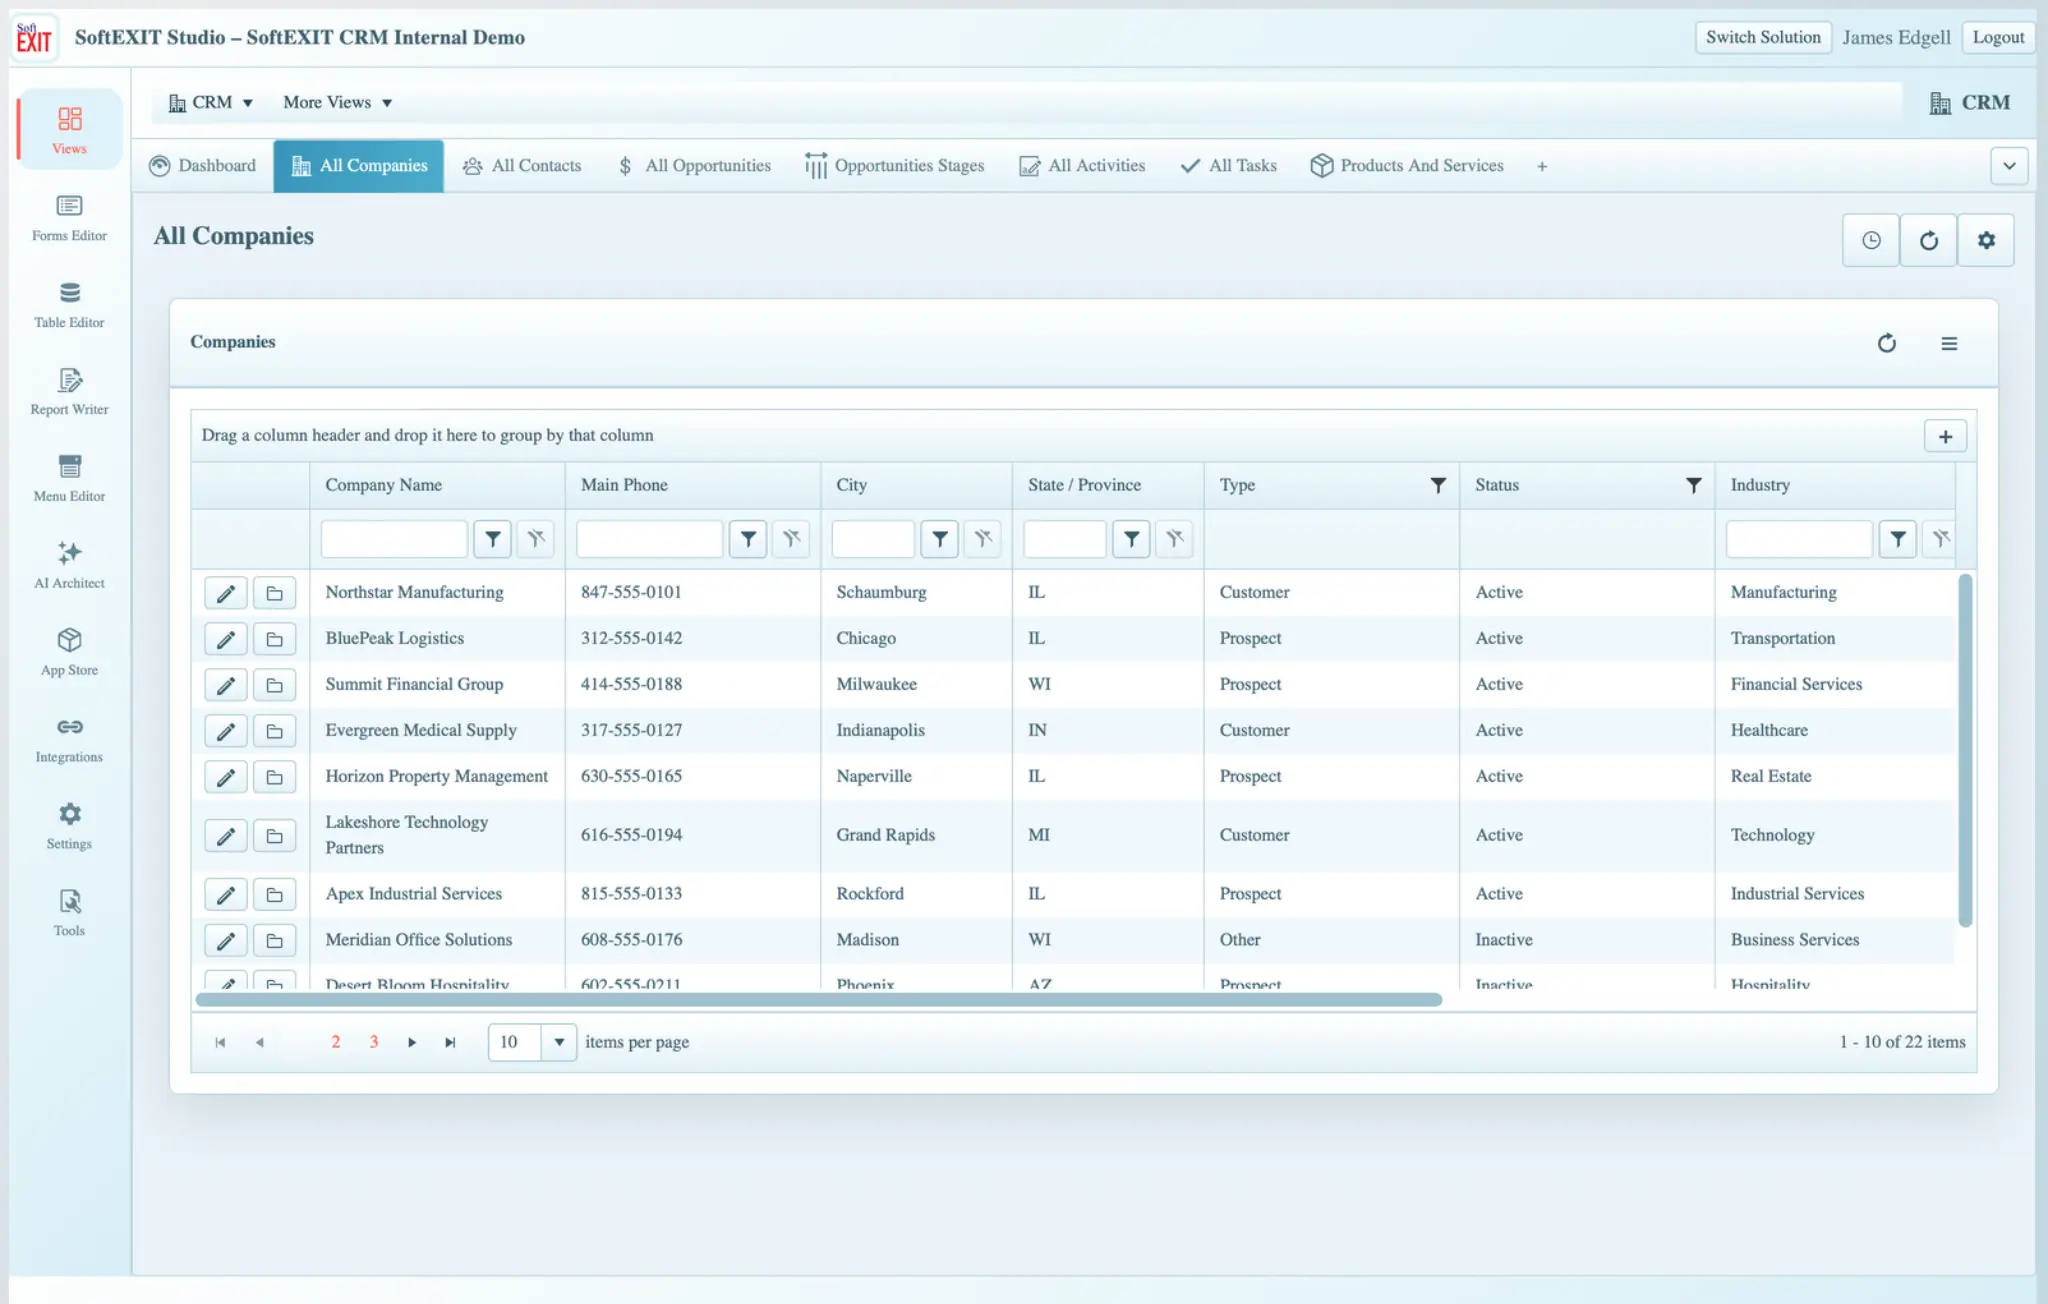
Tables displayed as Grids support column sorting, filter inputs, paging, and scrolling. Where enabled, the + button creates a new record, a pencil icon edits a record, and a folder icon opens related records. Some Grids include an upward-arrow action to navigate to a related parent record. Your permissions may limit these actions.
Use the Sales Dashboard
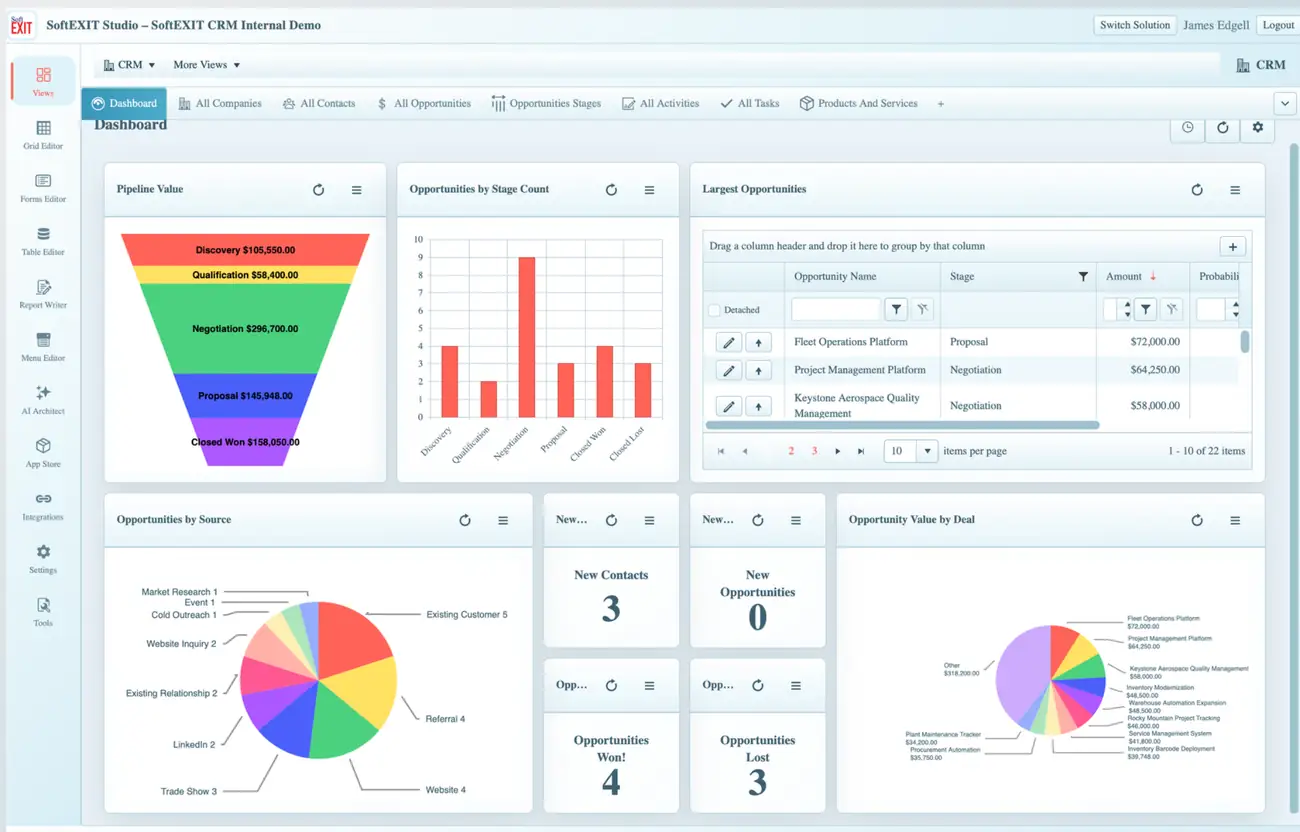
The Dashboard combines several kinds of View Components. The example shows a Pipeline Value funnel grouped by sales stage, an Opportunities by Stage Count bar chart, a Largest Opportunities Grid, an Opportunities by Source pie chart, and smaller KPI counters.
How to use these metrics
- Review the funnel to understand which sales stages contain the greatest opportunity value.
- Compare the stage-count chart with the funnel; a large value does not necessarily mean a large count.
- Review the Largest Opportunities Grid and open the records that need your attention.
- Use the source chart to understand where tracked opportunities originated.
- Open the relevant Opportunities View to update the underlying opportunity details, then refresh the dashboard if needed.
The dashboard is a view of CRM data; its usefulness depends on records being maintained accurately. Totals and charts will reflect your organization’s own data and configuration.
Manage Companies and Their Related Records
Companies are the main organizational records in this CRM example. Open CRM → All Companies to find a customer or prospect. The Grid shows identifying details such as company name, phone, city, state, type, status, and industry. Filter or sort to narrow the list.
Open a company’s child records
- Locate the company in All Companies.
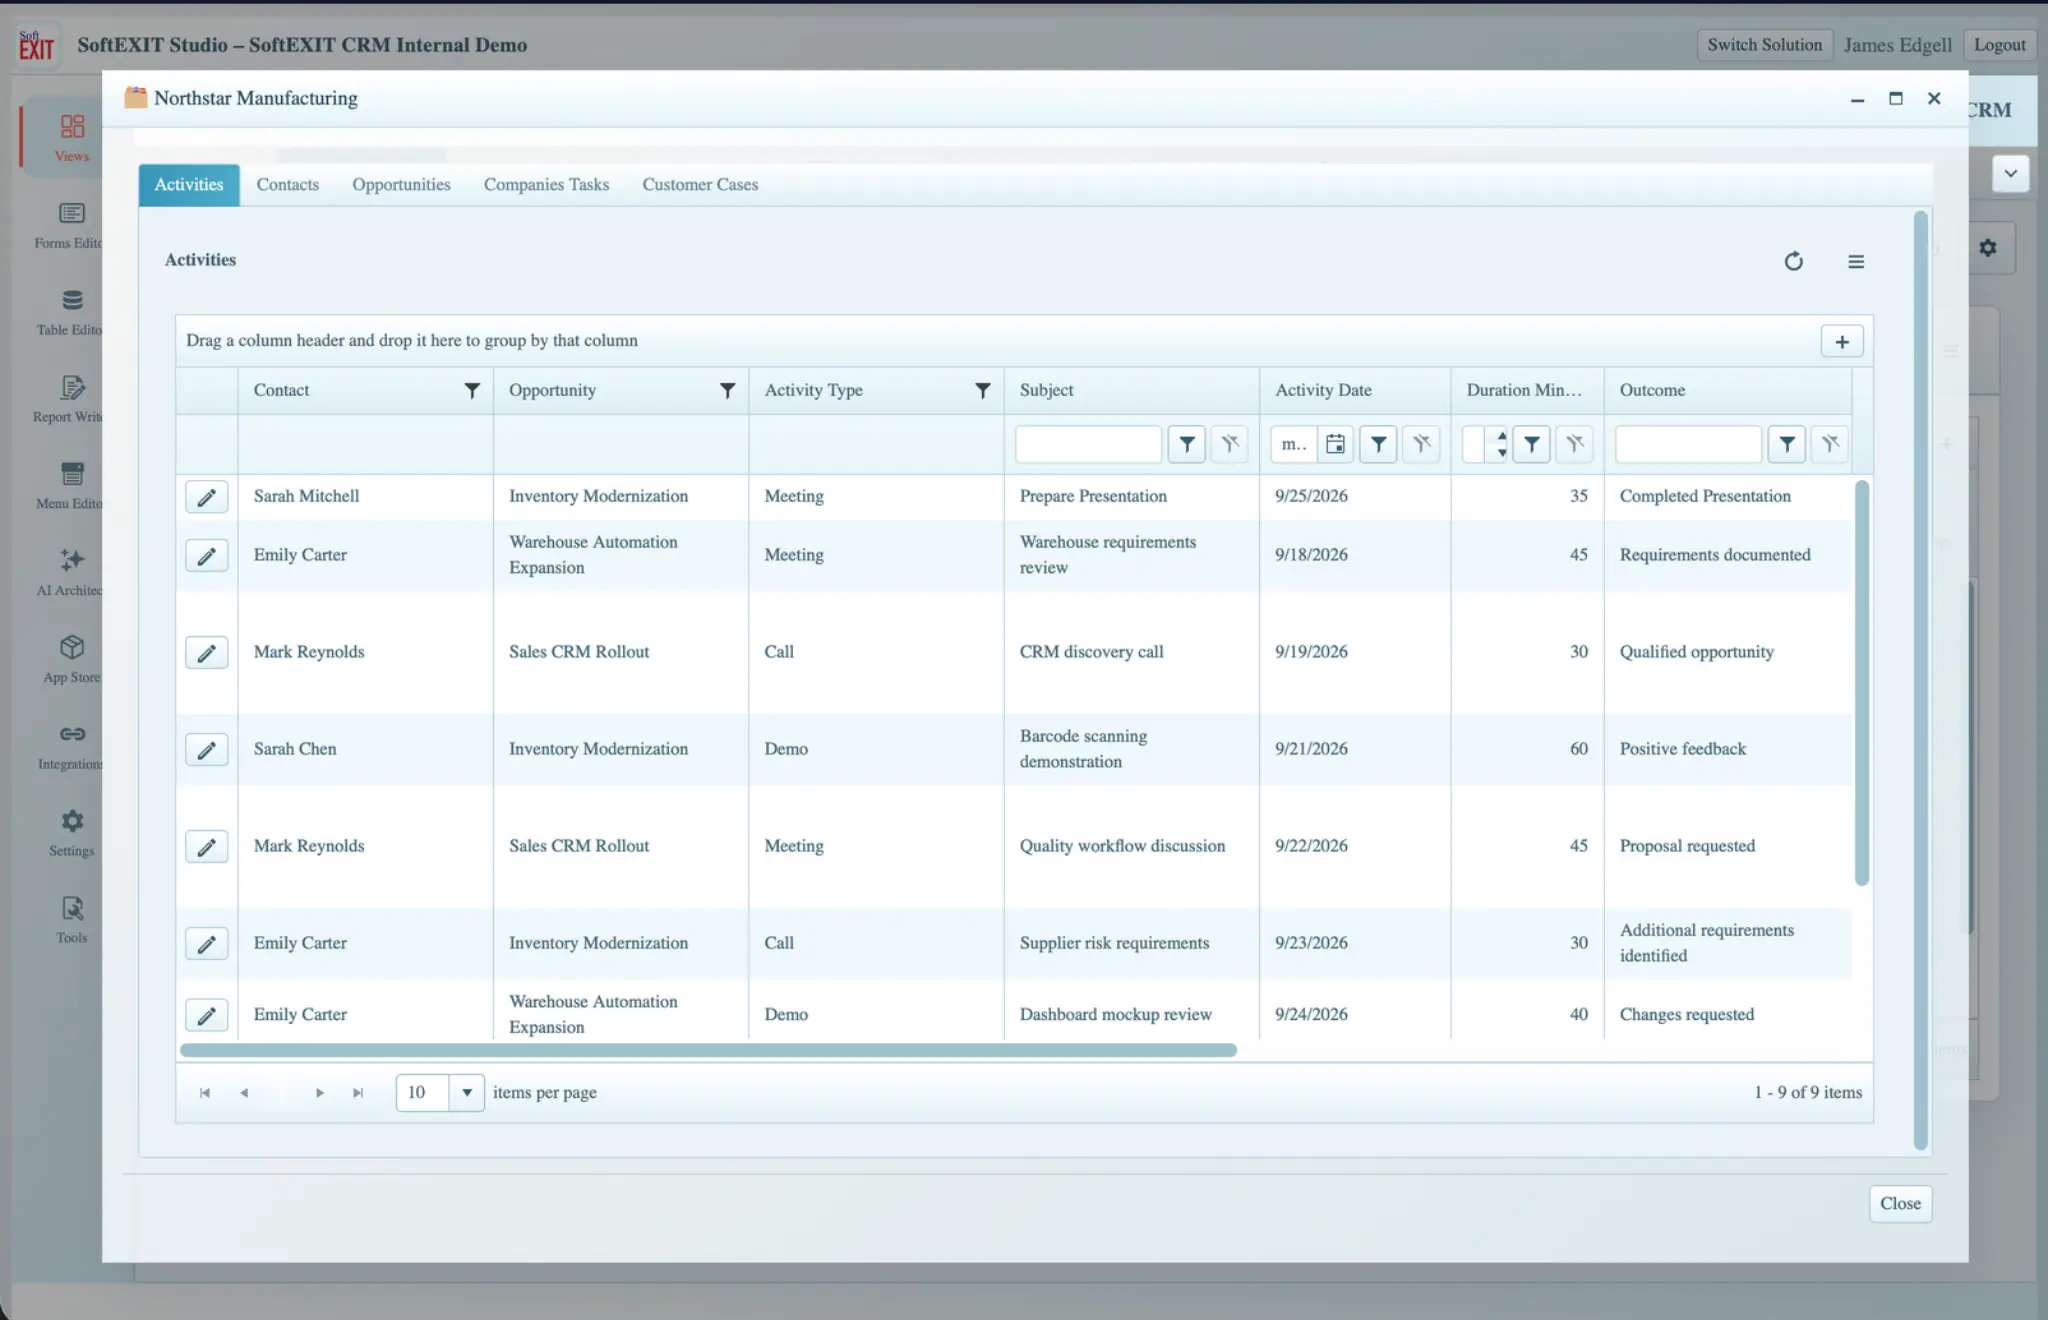
- Select its folder icon to open the related-record window.
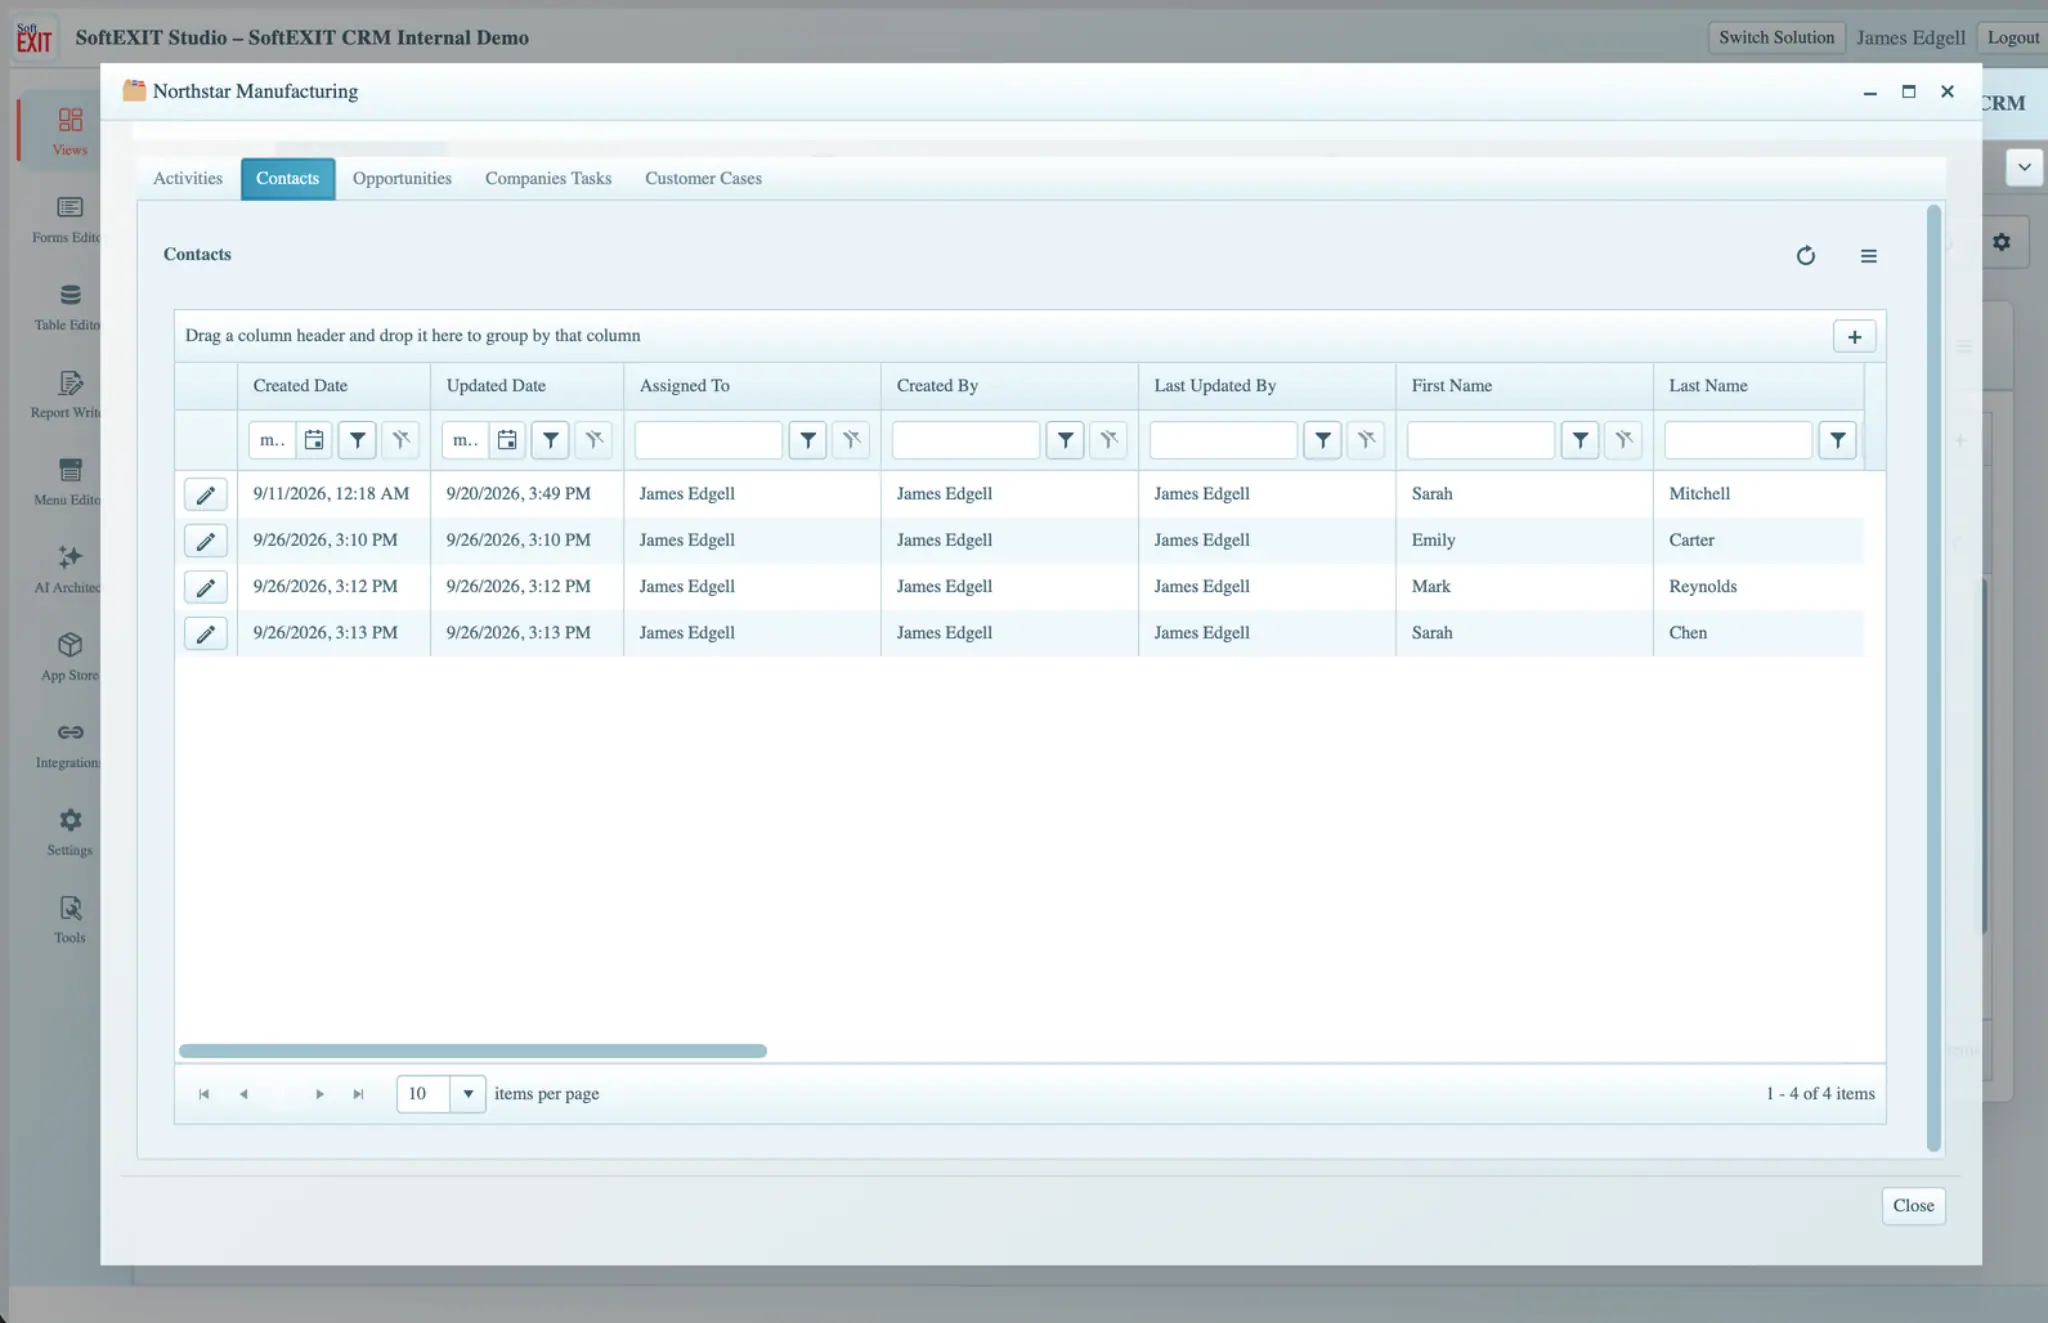
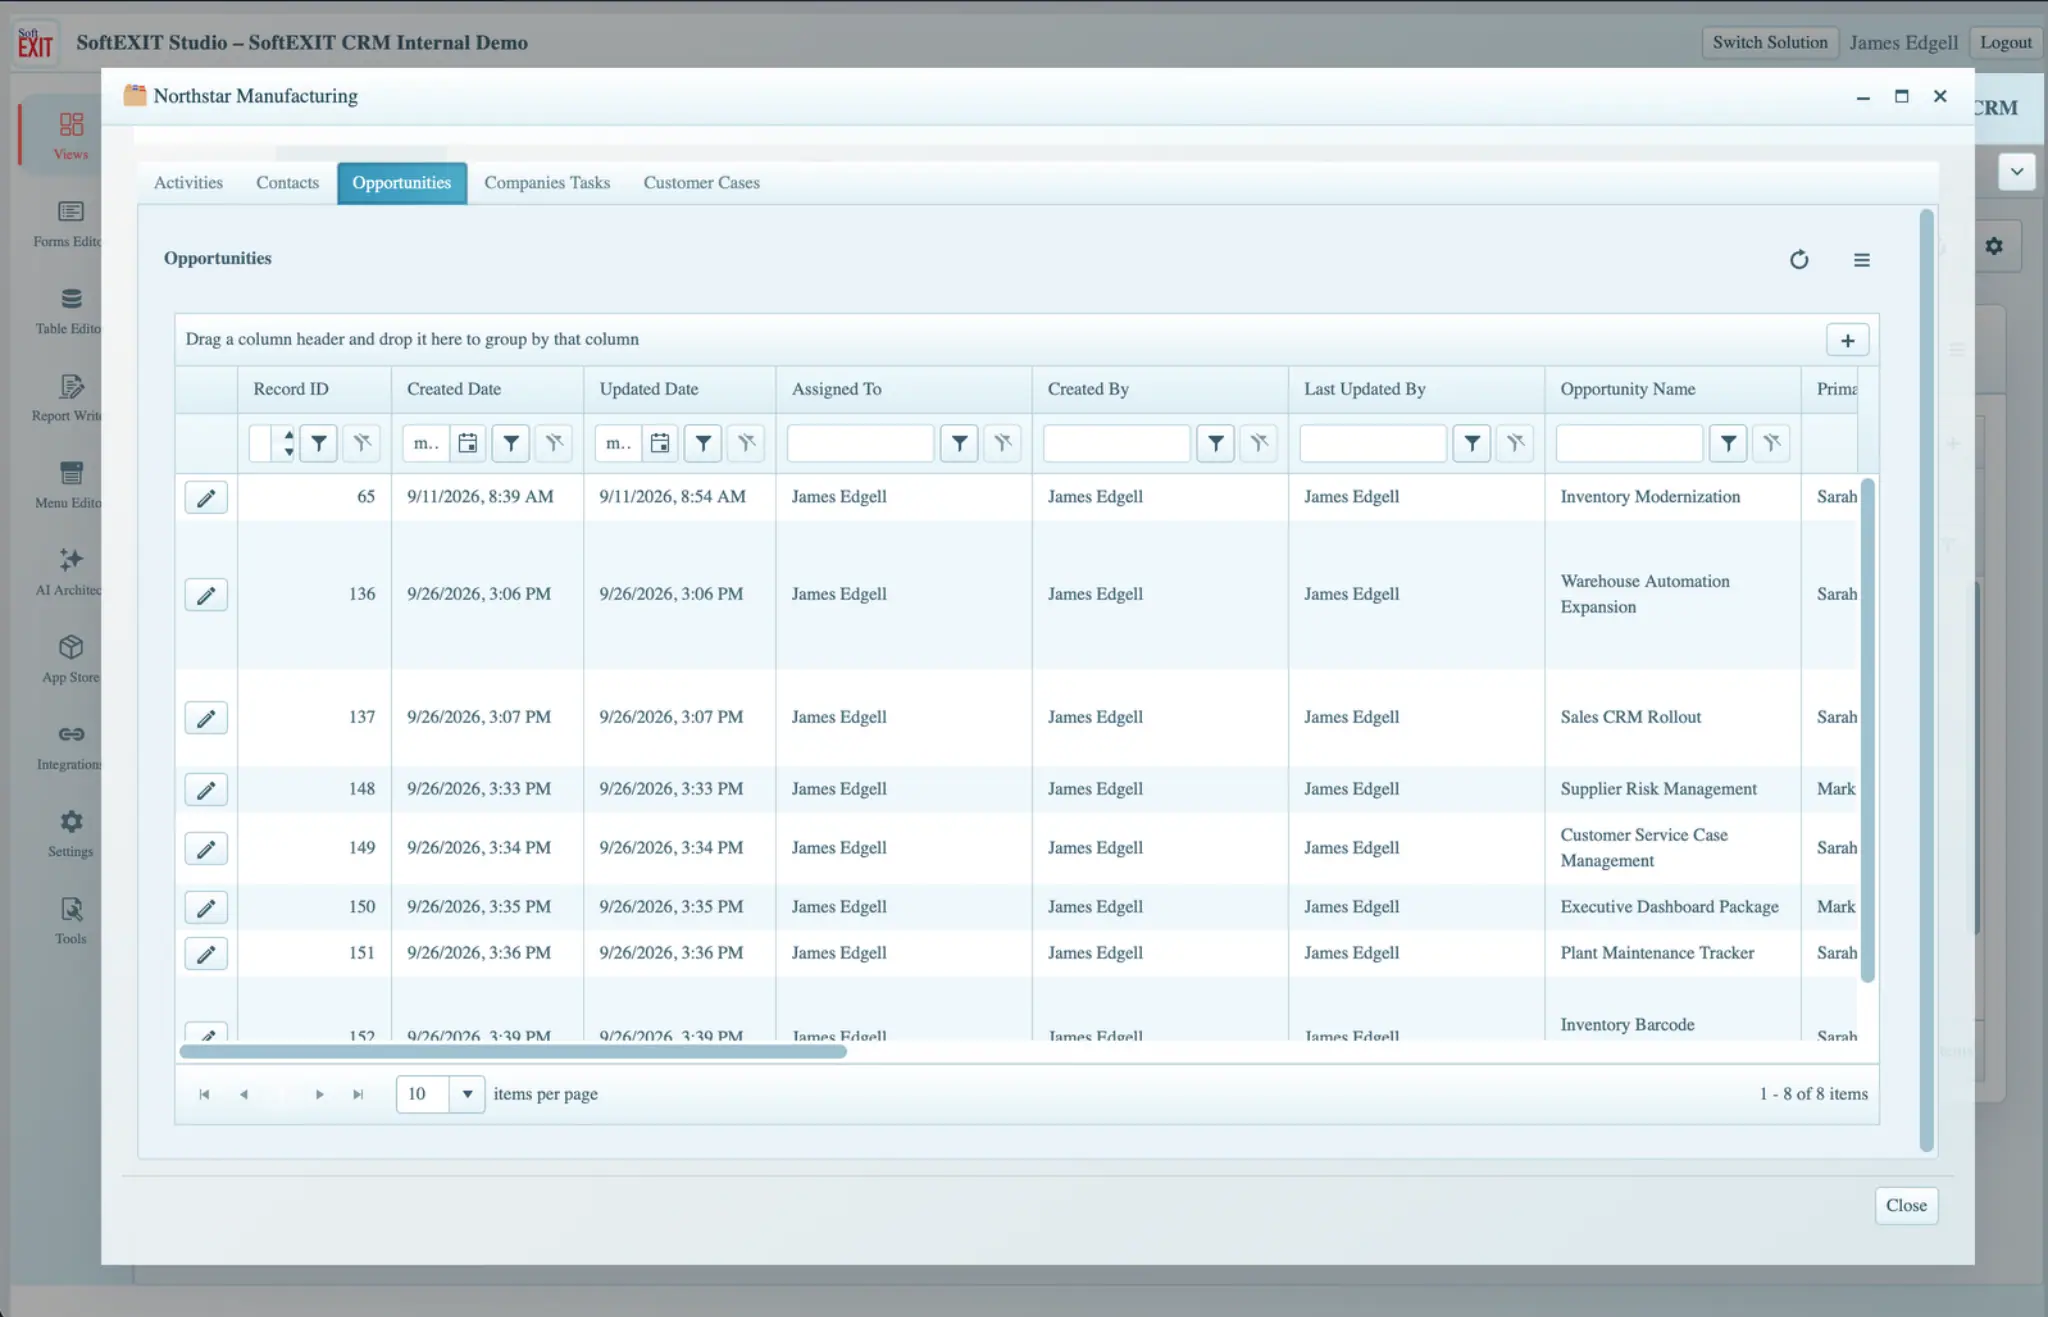
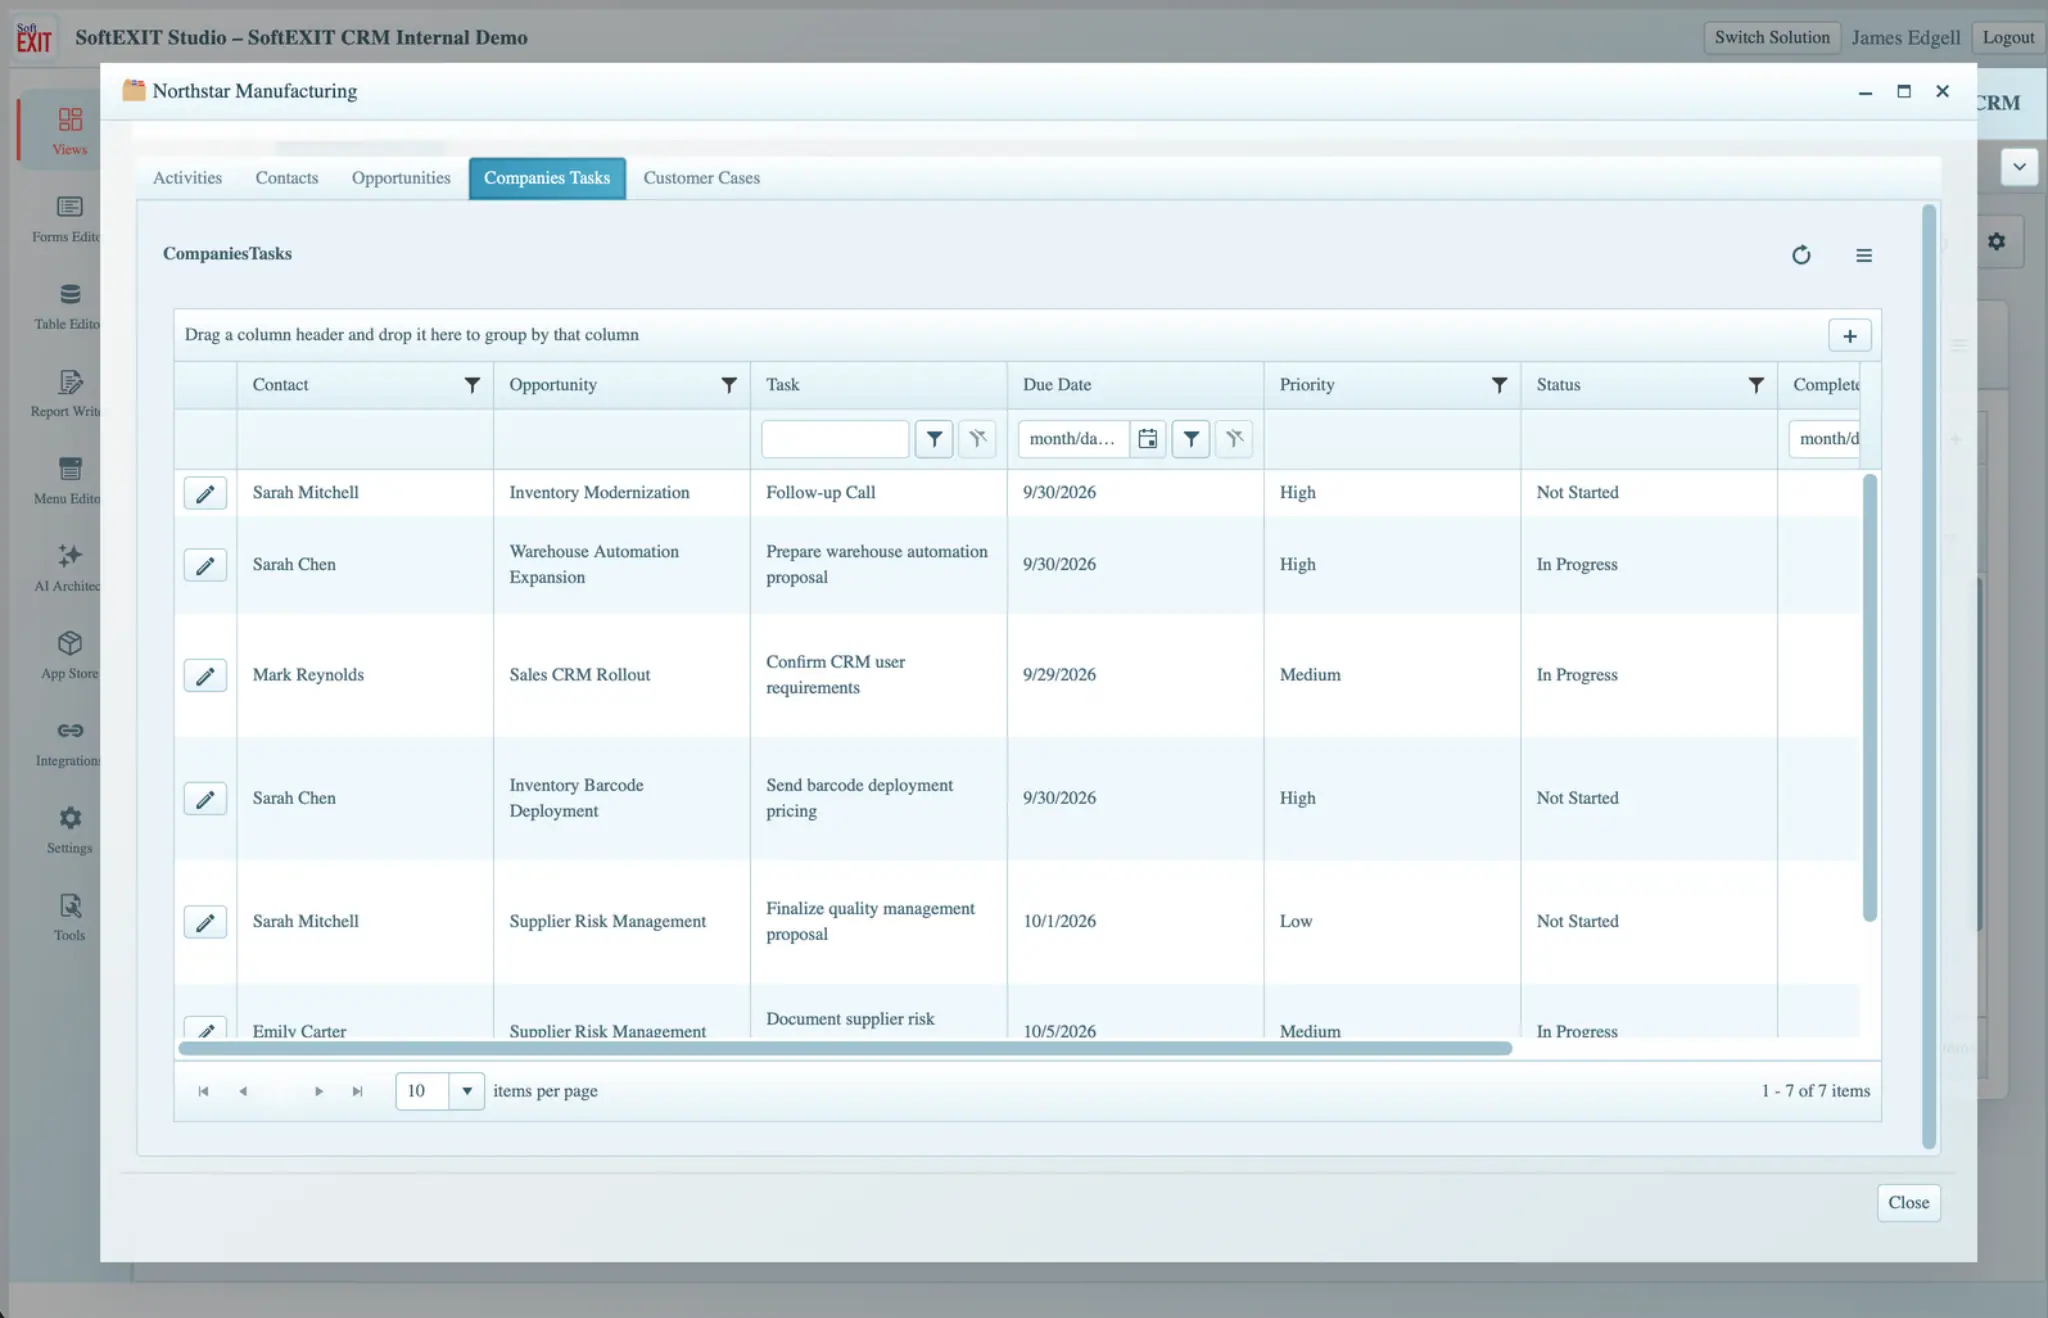
- Use the tabs for Activities, Contacts, Opportunities, Companies Tasks, and Customer Cases.
- Review existing child records before adding duplicates.
- Use the available add or edit actions in a child Grid to work on a record. The company relationship is retained when creating a child from its context.
Create and Maintain Contacts
A Contact represents a person you communicate with at a company. Open a company’s Contacts tab or use the standalone All Contacts View. Select an existing contact to edit it, or use the available add action to create a new one.
A contact-entry checklist
- Confirm the correct parent Company.
- Enter First Name and Last Name.
- Add useful contact channels such as Email, Phone, or Mobile.
- Choose Lifecycle and Status values where required.
- Record Source and the Assigned To owner when applicable.
- Set Preferred Contact Method and check Do Not Contact when required.
- Save, then reopen the record to confirm that the values were stored correctly.
Fields marked with a red asterisk are required in the particular configured Form shown. Your organization’s Form design can differ.
Track Sales Opportunities
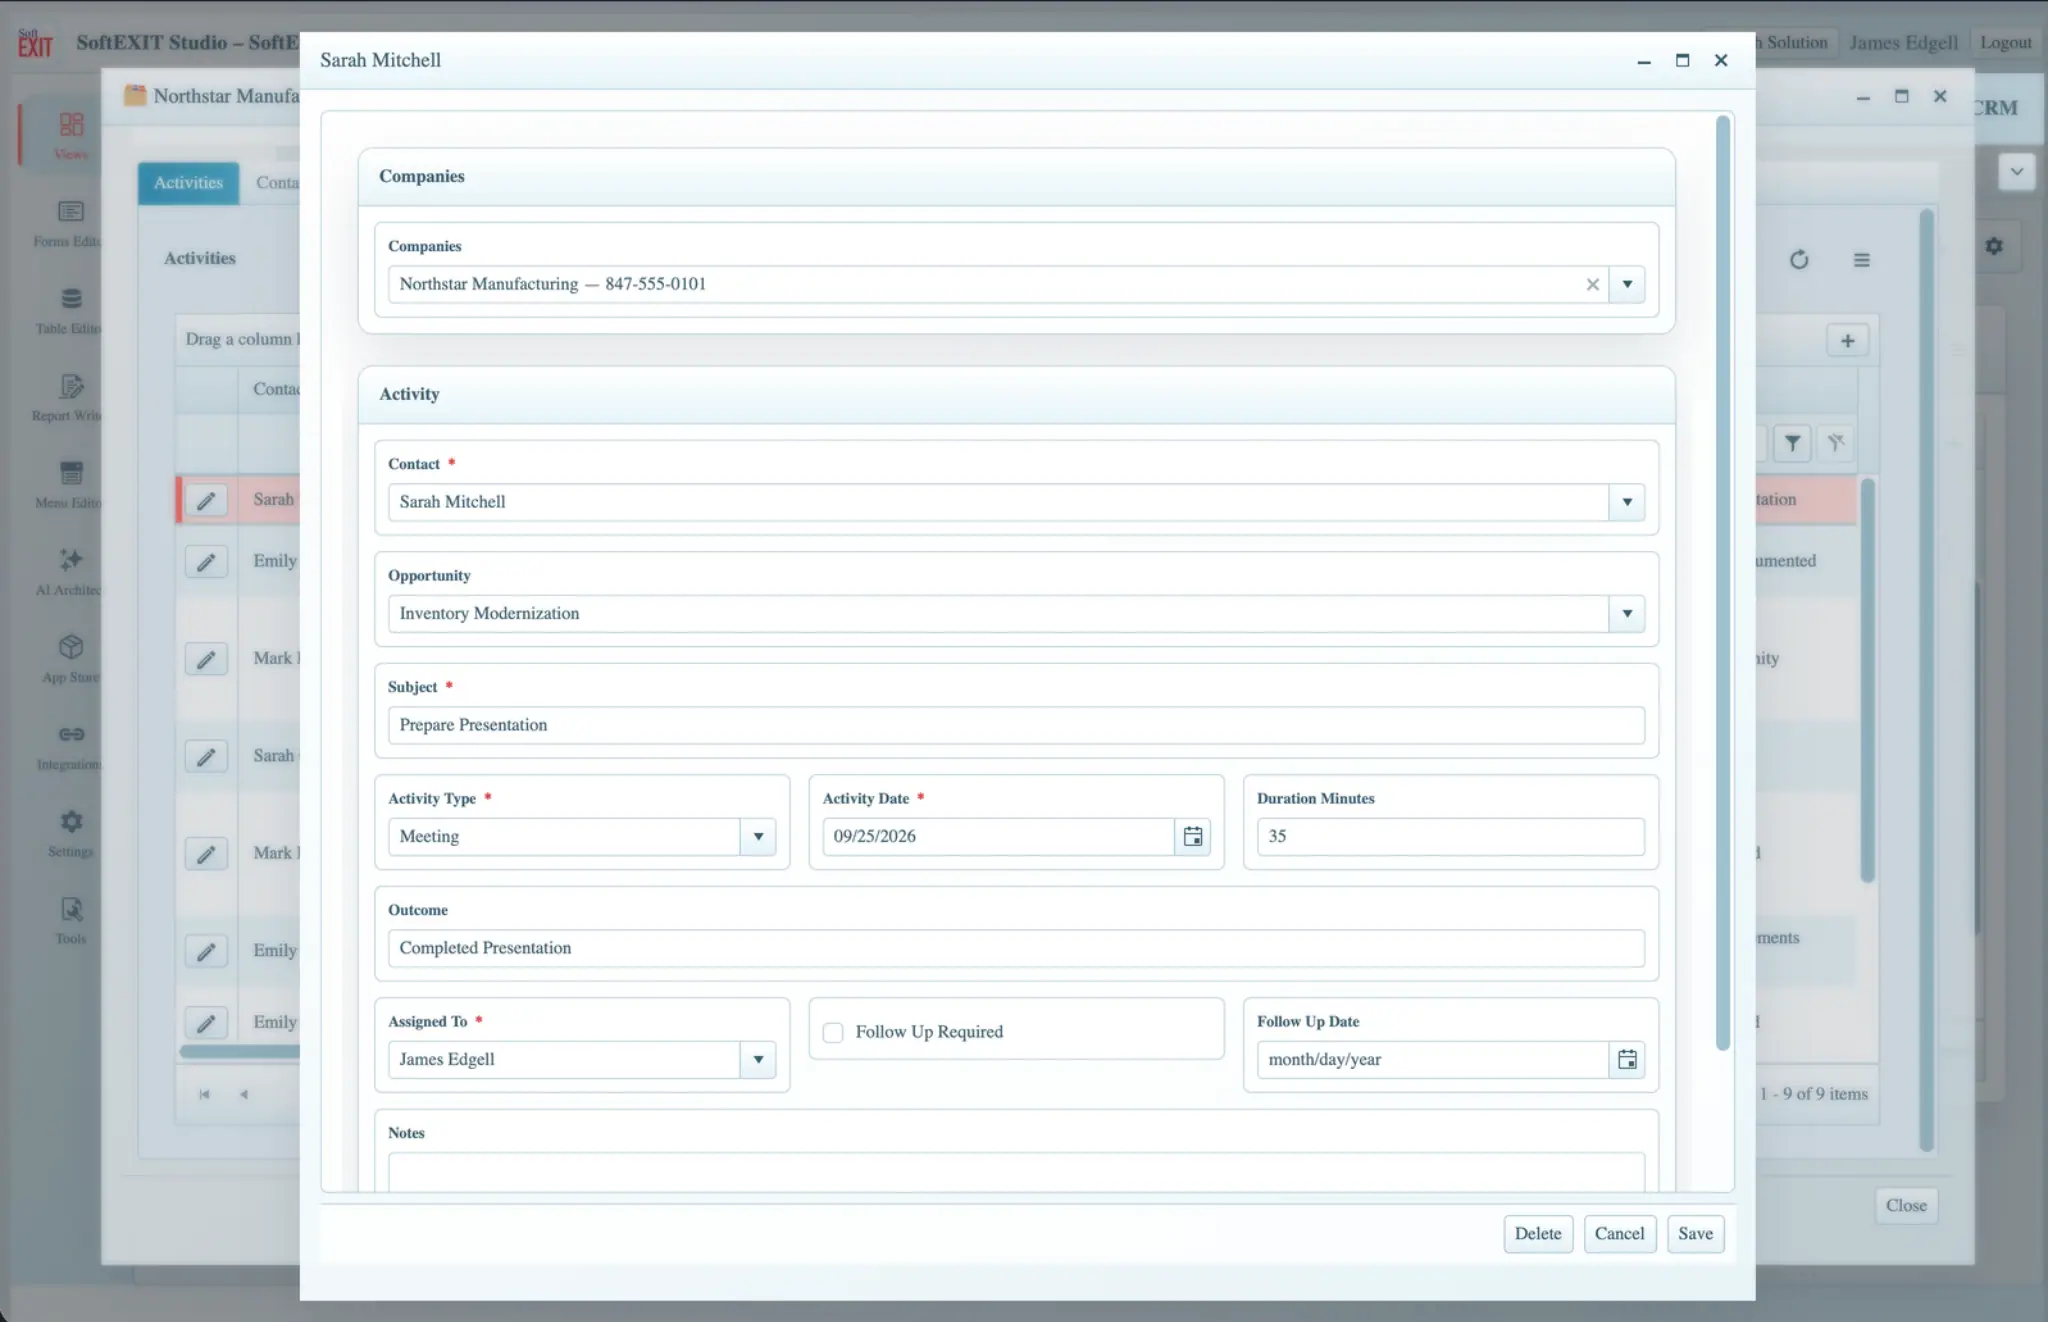
An Opportunity represents potential or completed business. In All Opportunities or a company’s Opportunities tab, you can maintain an opportunity’s name, contact, sales stage, financial amount, probability, closing dates, source, owner, and next step.
Update an opportunity
- Locate the Opportunity in the Grid and click the pencil icon.
- Confirm the parent company and Primary Contact.
- Set the correct Stage as the deal progresses.
- Enter or update Amount and Probability with realistic values.
- Maintain Expected Close Date and, when applicable, Actual Close Date.
- Assign an owner, add the next step, and save.
- Return to the Dashboard or Status Board to view the updated pipeline.
Example: Your team may move a deal from Discovery through Qualification, Negotiation, and Proposal before marking it Closed Won or Closed Lost. The exact pipeline stages come from your organization’s configuration.
Work with the Opportunity Status Board
Open CRM → Opportunities Stages to use the visual Status Board (Kanban-style view). Columns group opportunity cards by stage. Each card can display the opportunity name and configured summary fields, including Amount and Probability.
Use this screen for a quick review of the pipeline, then open the opportunity to update its business details. If your board allows dragging, moving a card can change its status; some boards deliberately disable dragging or are configured read-only. Never assume a drag is available on every board.
A practical weekly pipeline review
- Start with Discovery and Qualification to find deals needing follow-up.
- Review Negotiation and Proposal cards for blockers and expected close dates.
- Check that every active opportunity has a current owner and next step.
- Verify Closed Won and Closed Lost records and their final status.
- Return to the dashboard to check stage values and counts.
Log Activities and Follow-Ups
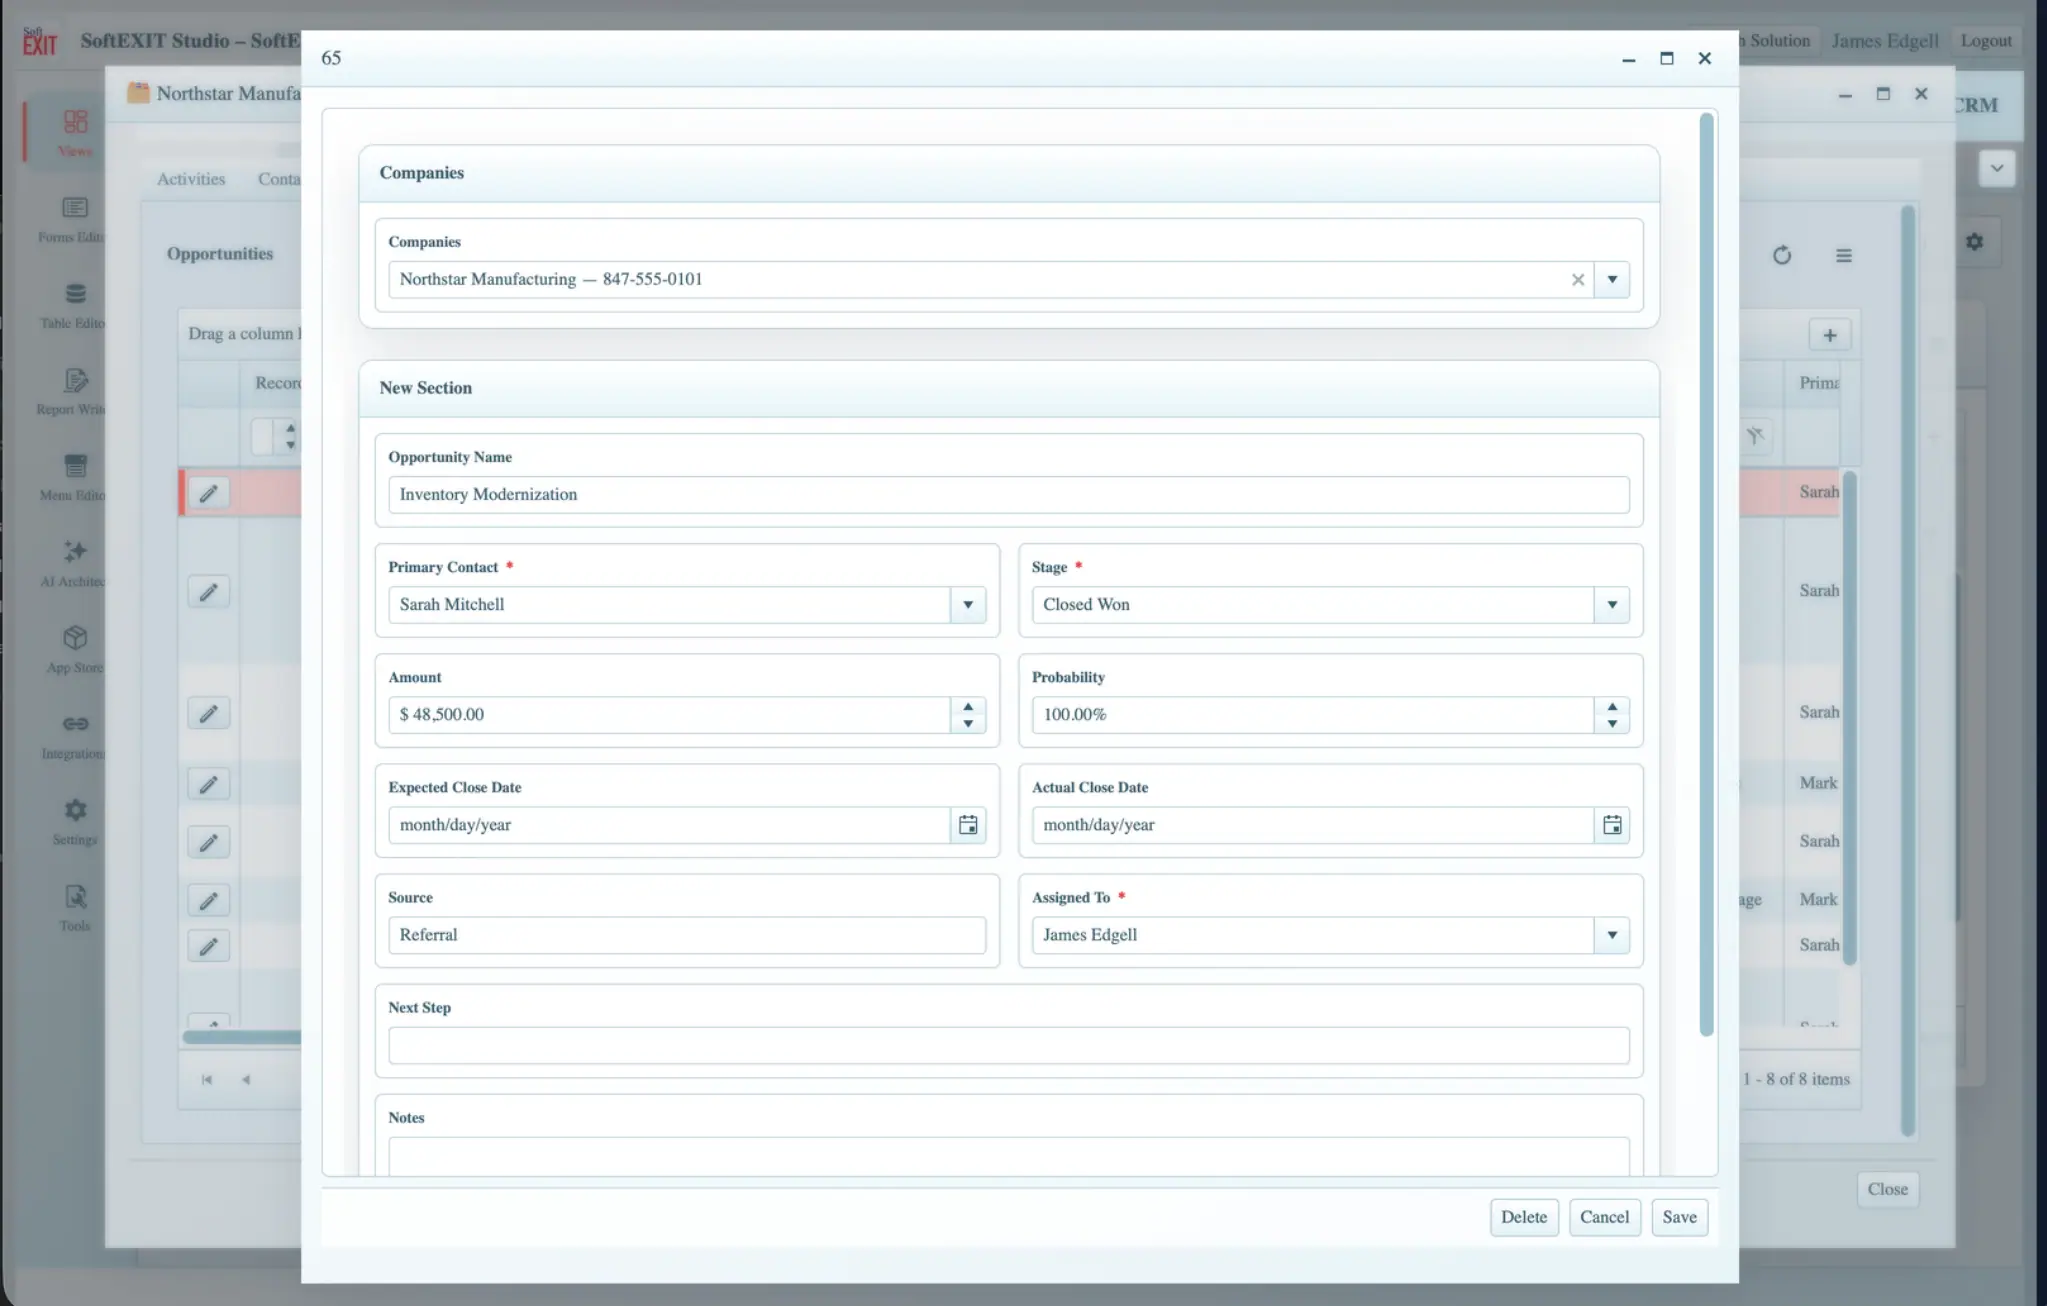
Activities capture interactions such as meetings, calls, and demonstrations. Open All Activities or a Company’s Activities tab. Activities can connect to a contact, an opportunity, and the parent company, helping your team maintain context.
Record a completed interaction
- Choose the Company, Contact, and related Opportunity as applicable.
- Enter a meaningful Subject rather than a generic description.
- Choose Activity Type and Activity Date.
- Record Duration Minutes, Outcome, and Notes if relevant.
- Confirm the record owner under Assigned To.
- When another step is needed, mark Follow Up Required and enter the Follow Up Date if the configured Form permits.
- Save and verify that the activity appears under the correct company.
Organize Tasks and Next Steps
Tasks are trackable pieces of work, separate from the interaction history stored in Activities. Open All Tasks or a company’s Companies Tasks tab. They can identify the person responsible, the related Contact or Opportunity, a due date, priority, status, and completion date.
Create a follow-up Task
- Give the task a clear action-oriented name such as “Prepare proposal” or “Schedule discovery call”.
- Link the relevant Contact and Opportunity where appropriate.
- Set Due Date and Priority.
- Assign the responsible user under Assigned To.
- Set Status such as Not Started or In Progress and add context in Notes.
- When the work is done, update Status and the Completed Date if used by your organization.
Use My CRM Data for Focused Work
The My CRM Data navigation group is intended to help a user focus on owned or relevant records. The example contains My Dashboard, My Companies, My Contacts, My Opportunities, My Activities, and My Tasks.
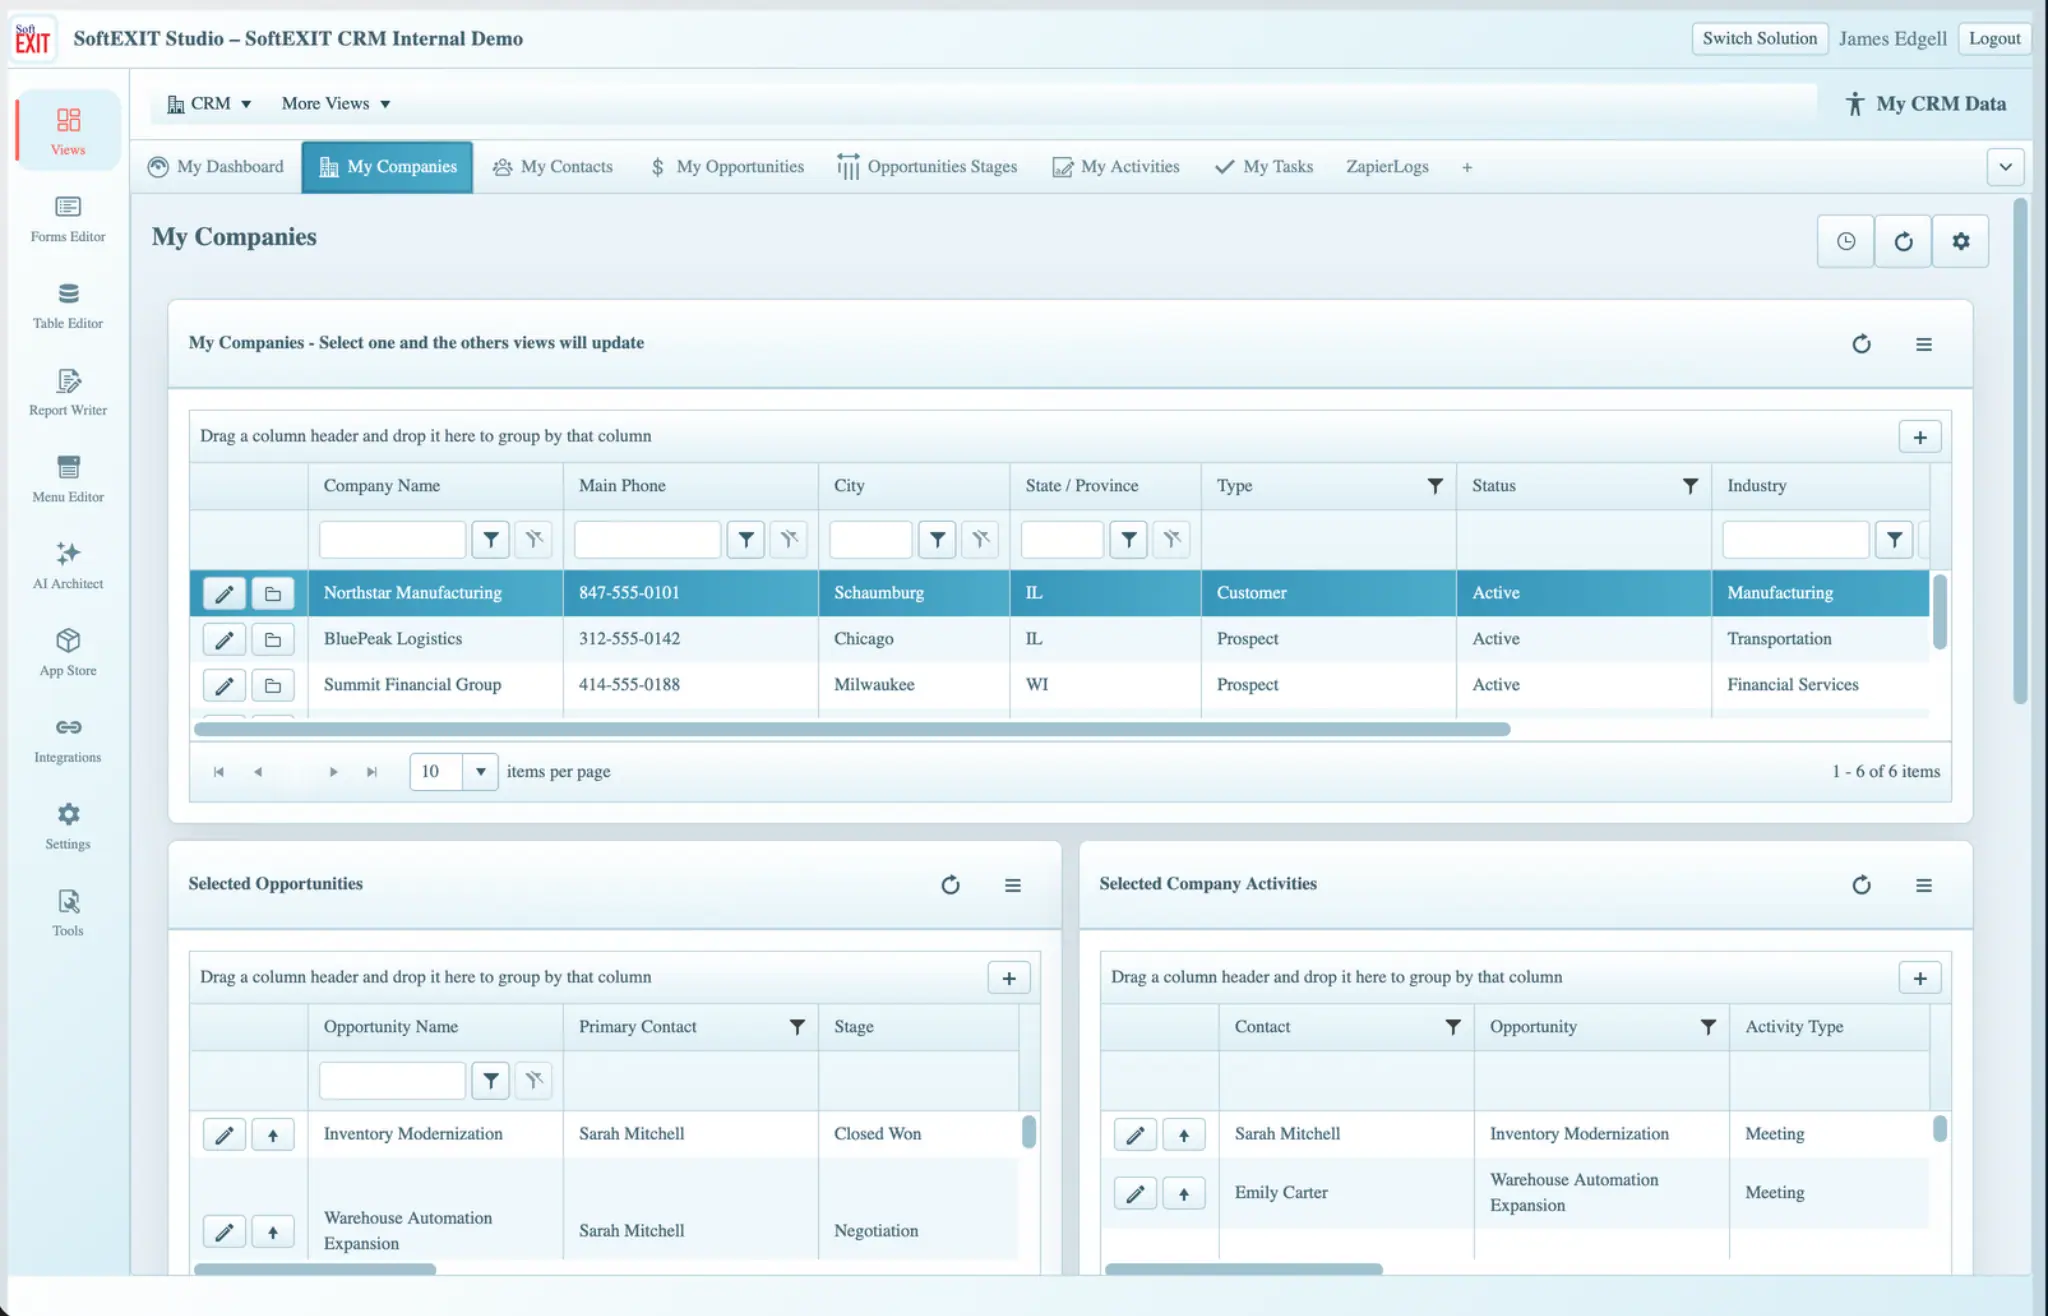
Select a company to update its related Views
In the illustrated My Companies screen, the top Grid says “Select one and the others views will update.” Select a company row. The related Grids beneath it, such as Selected Opportunities and Selected Company Activities, respond to that selection. This is a convenient way to move through information without opening multiple pages.
The precise meaning of “My” depends on how your CRM Views and ownership filters are configured. If an expected record is missing, first check its Assigned To owner and whether you have permission to view it.
Manage Customer Cases
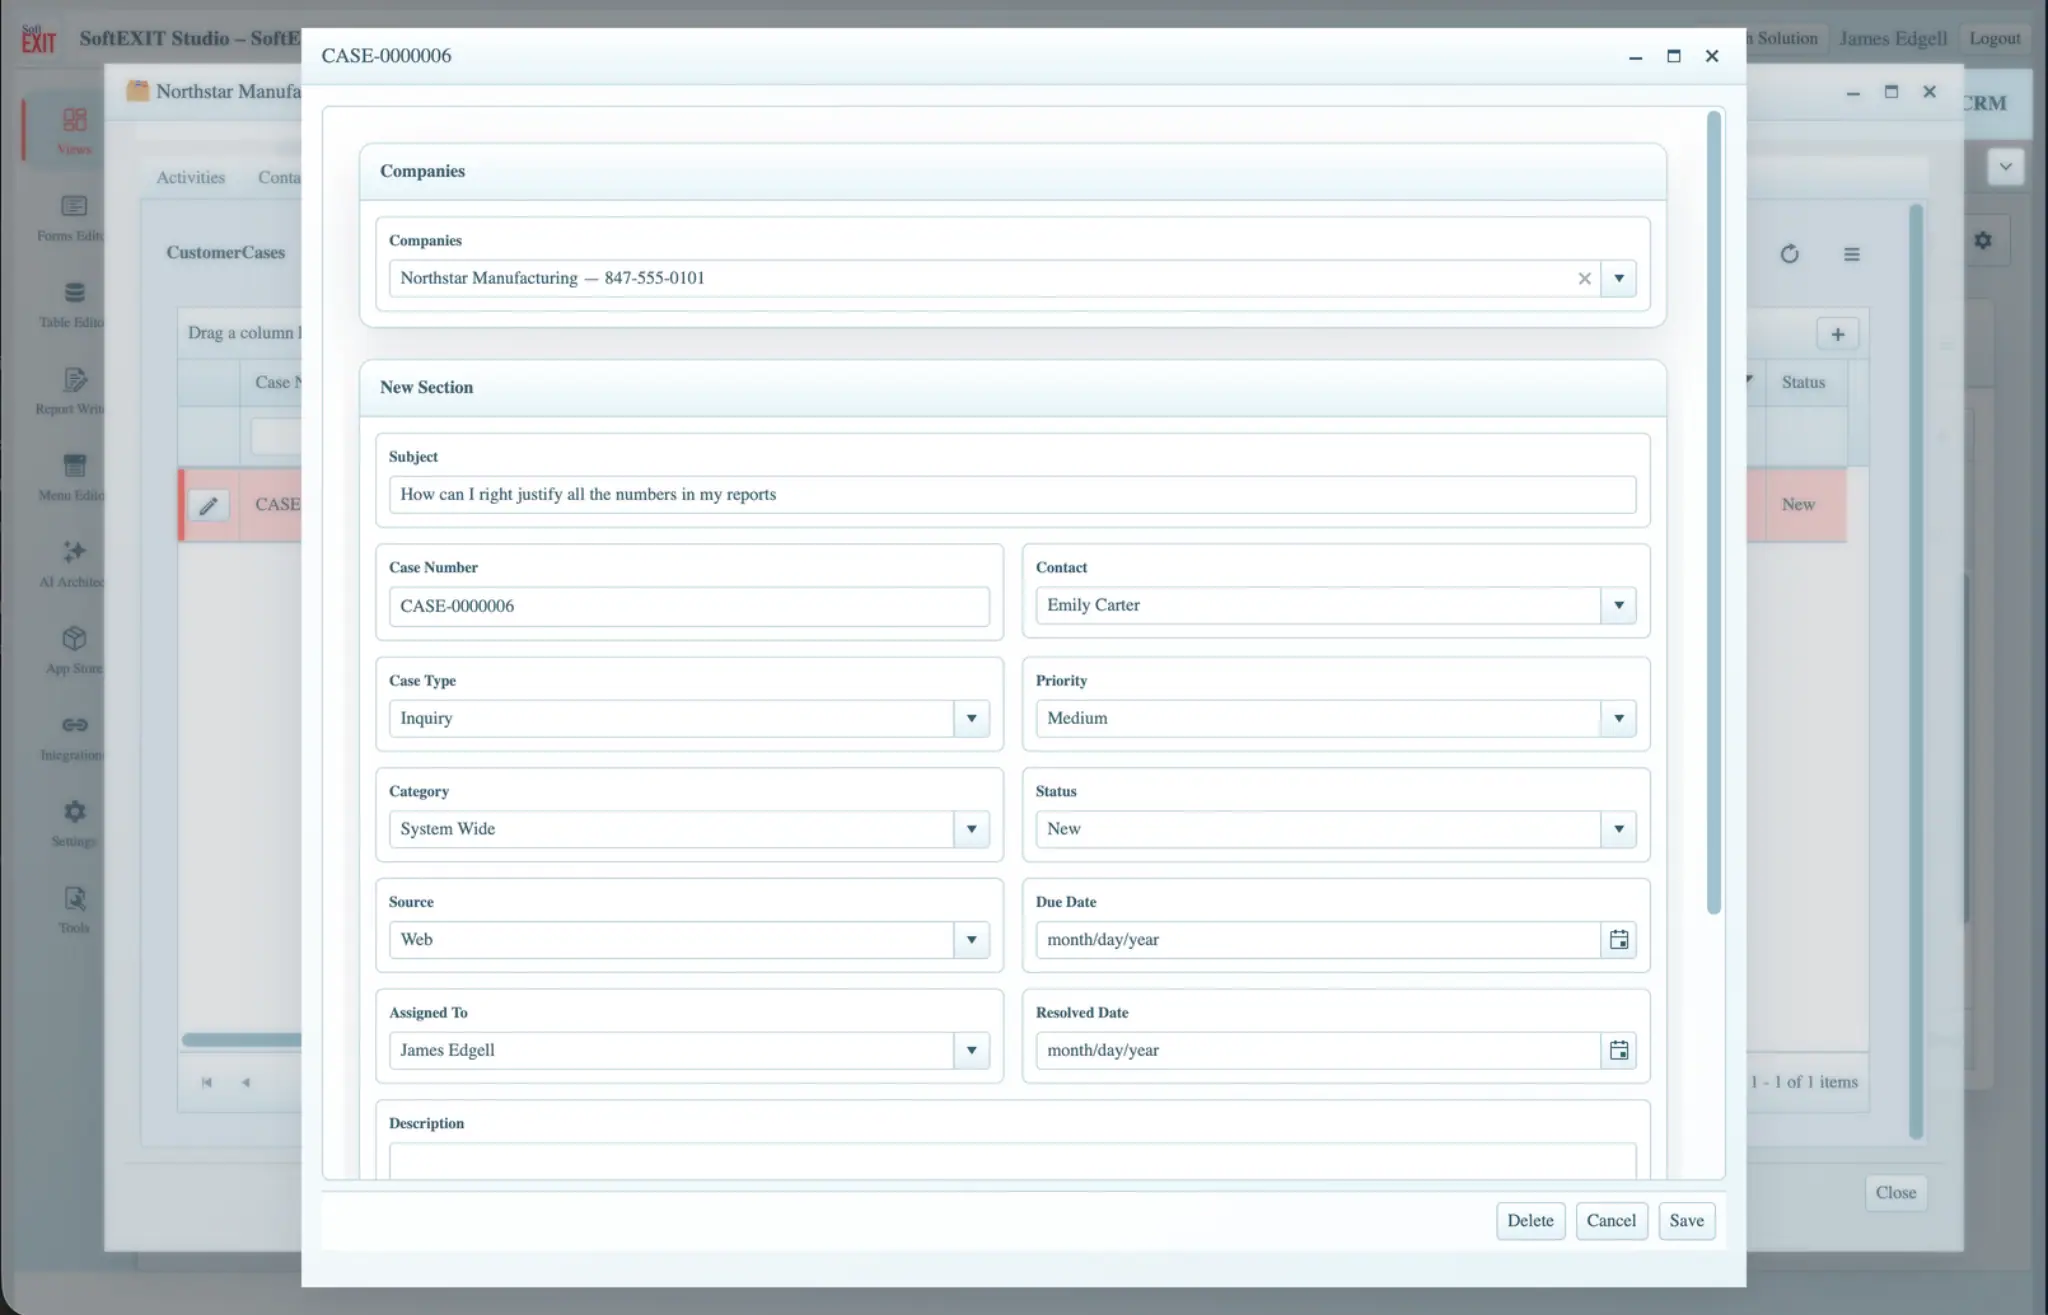
The Customer Support menu provides a separate workspace for service and support work. A Customer Case can track a subject, automatically generated case number, customer company, contact, case type, category, status, priority, due date, source, assigned user, and description.
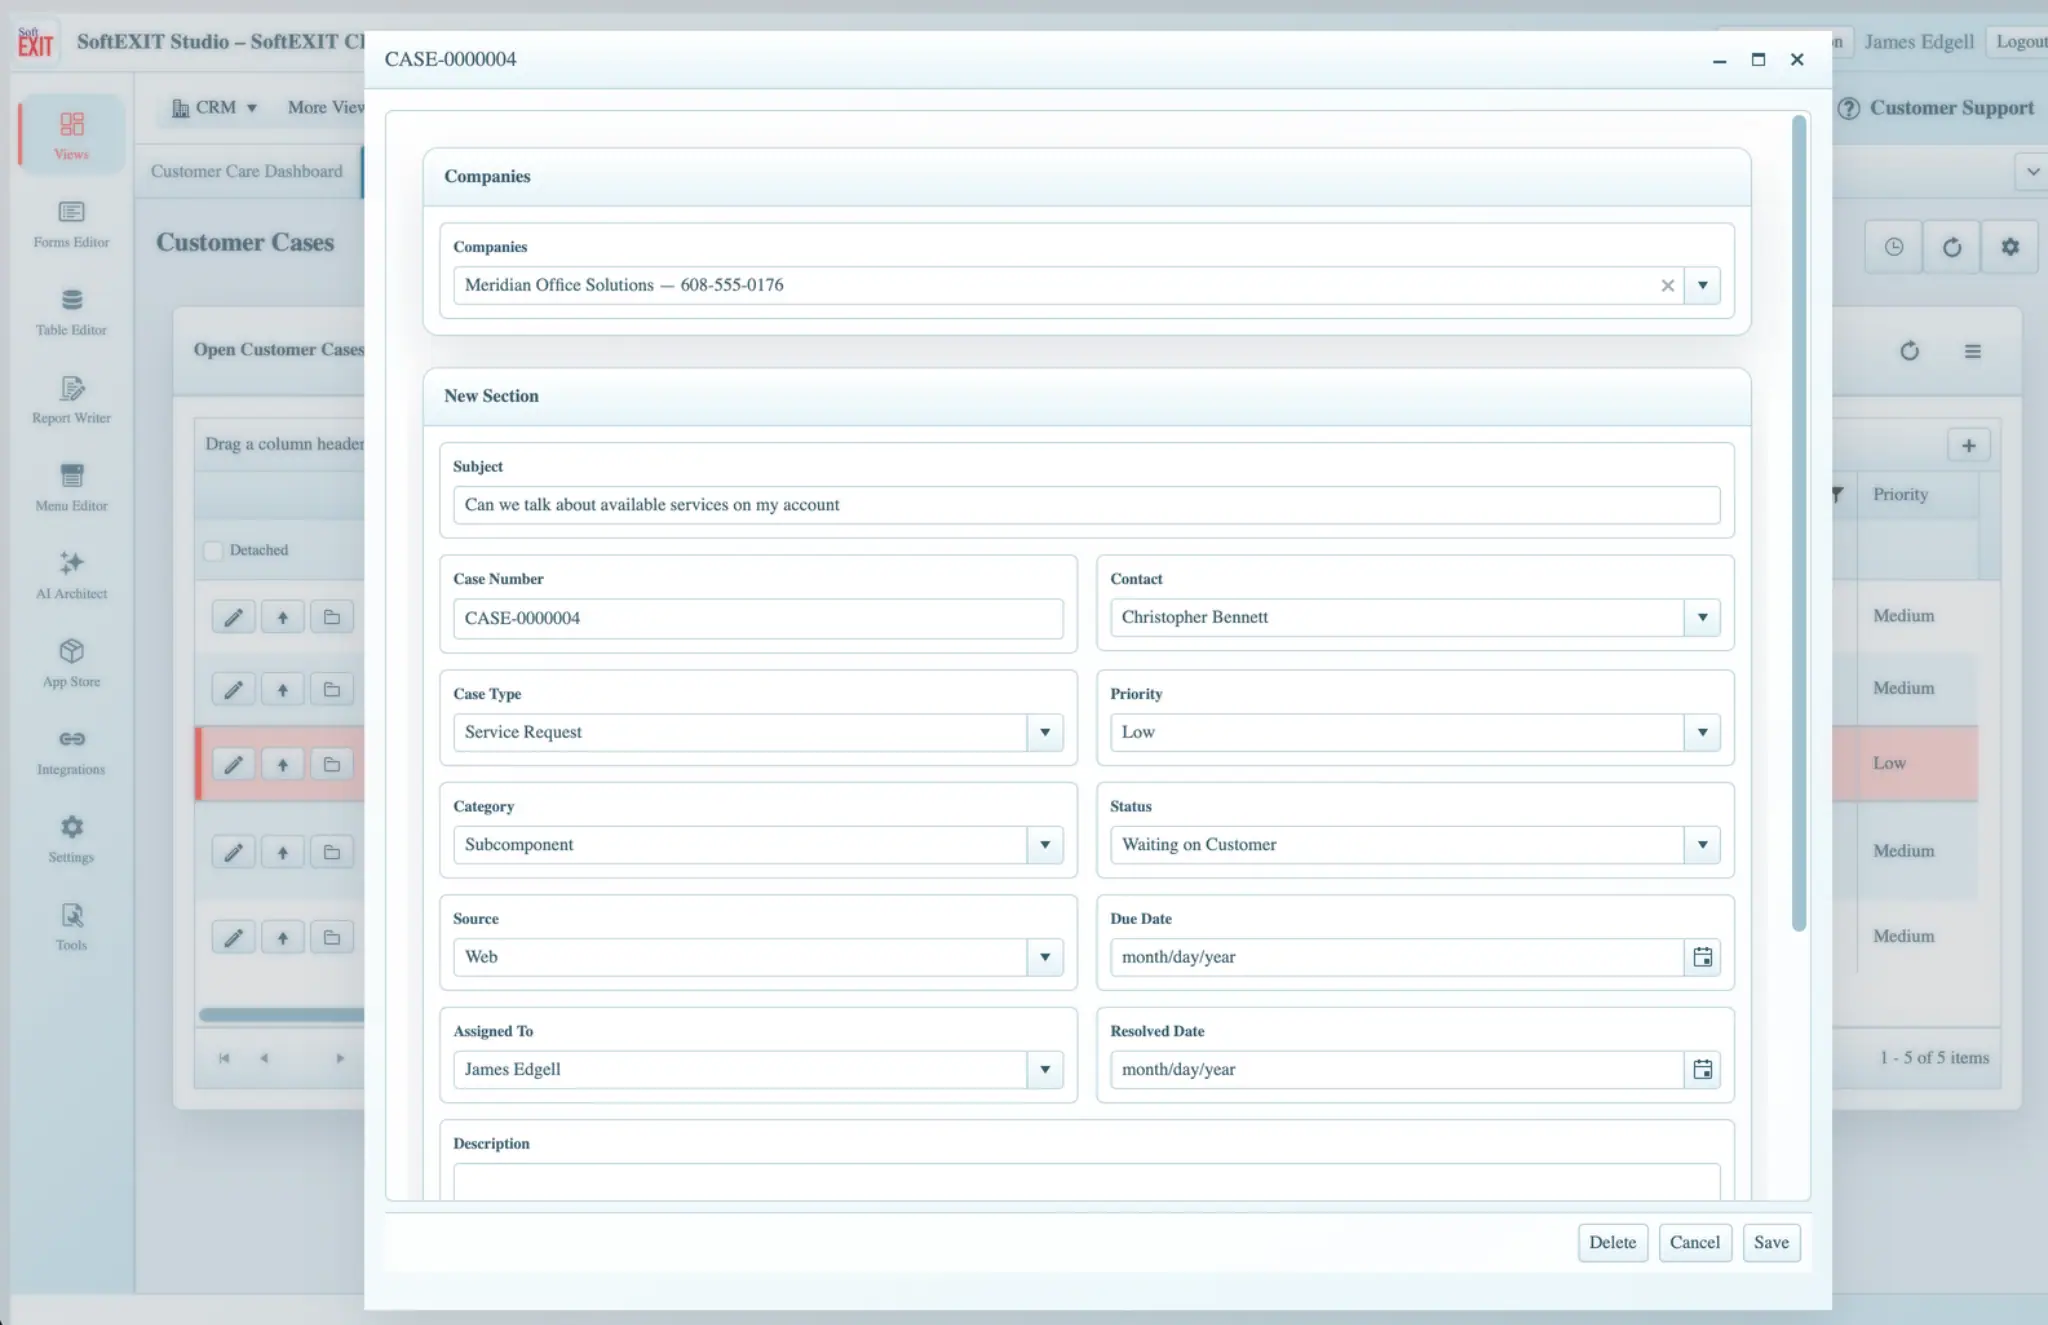
Create and update a Case
- Open Customer Support → Customer Cases or create a case from a company’s related records when enabled.
- Choose the correct Company and Contact.
- Enter a concise Subject describing the request or issue.
- Select Case Type, Category, Priority, and Status.
- Enter a Due Date and assign the responsible user where appropriate.
- Record the issue details in Description, then save.
- Reopen the case after subsequent contact to update Status, notes, or dates.
The example uses automatic case numbering in the format CASE-0000004, but actual formatting is determined by your configuration.
Monitor Customer Care Performance
The Customer Care Dashboard combines numerical counters and charts to show the state of support work. The screenshot includes Open Cases, New Cases, Over Due Cases, cases resolved this week or month, and charts grouped by case status and type.
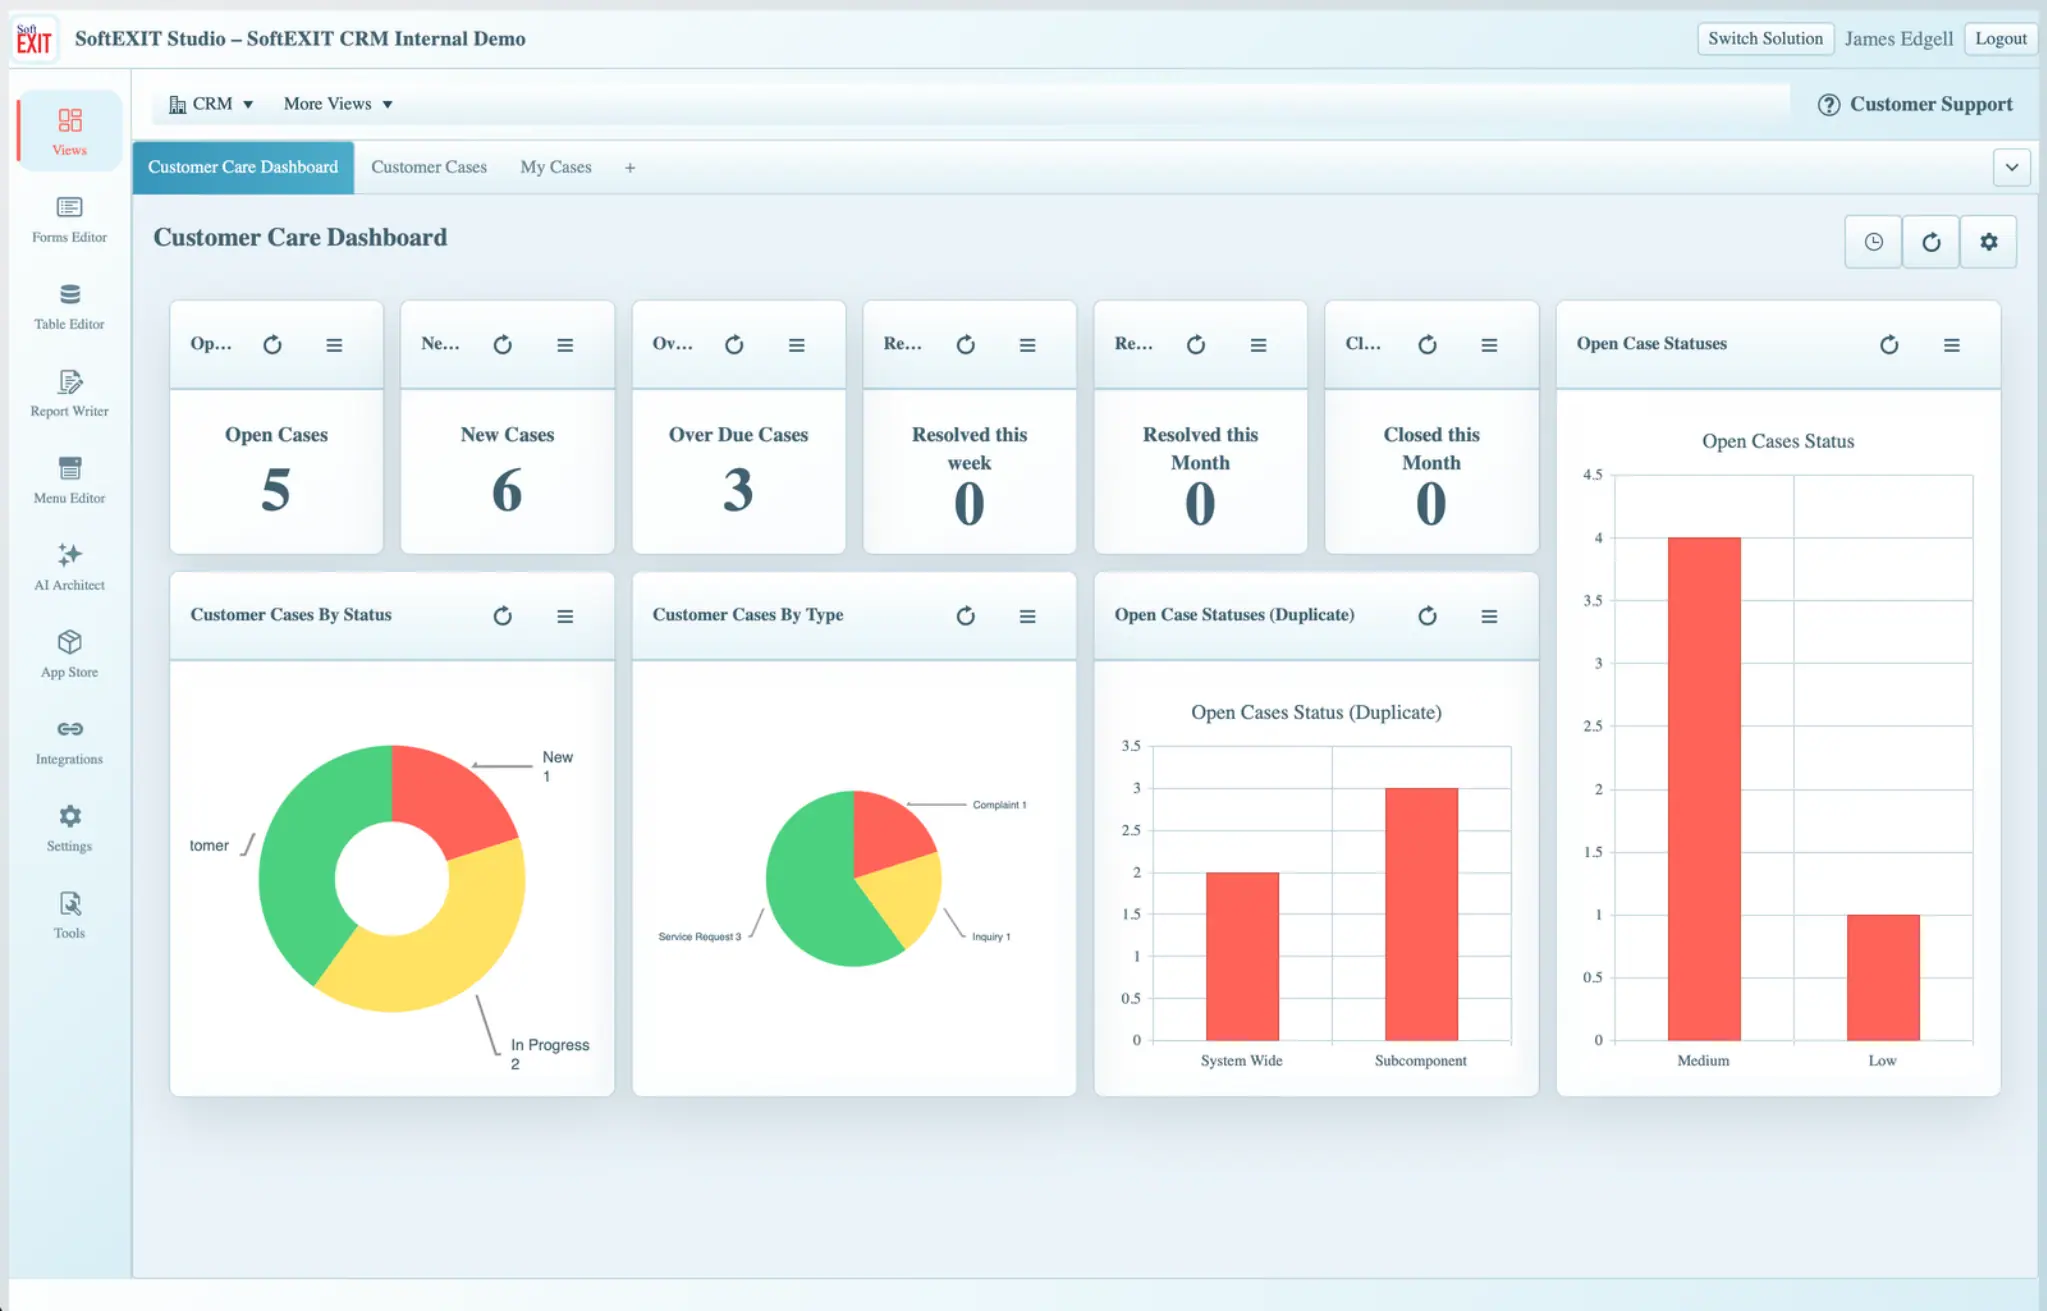
Turn dashboard observations into actions
- Check the number of Open Cases and New Cases to understand current workload.
- Review Over Due Cases to prioritize follow-up.
- Compare case distribution by Status, Type, and other available dimensions.
- Open Customer Cases to investigate records driving the totals.
- Update case assignments and statuses so the dashboard remains meaningful.
Some KPI labels can be shortened visually when dashboard tiles are narrow. Check the actual component heading or open the underlying View for full context.
Document Case History and Work Your Queue
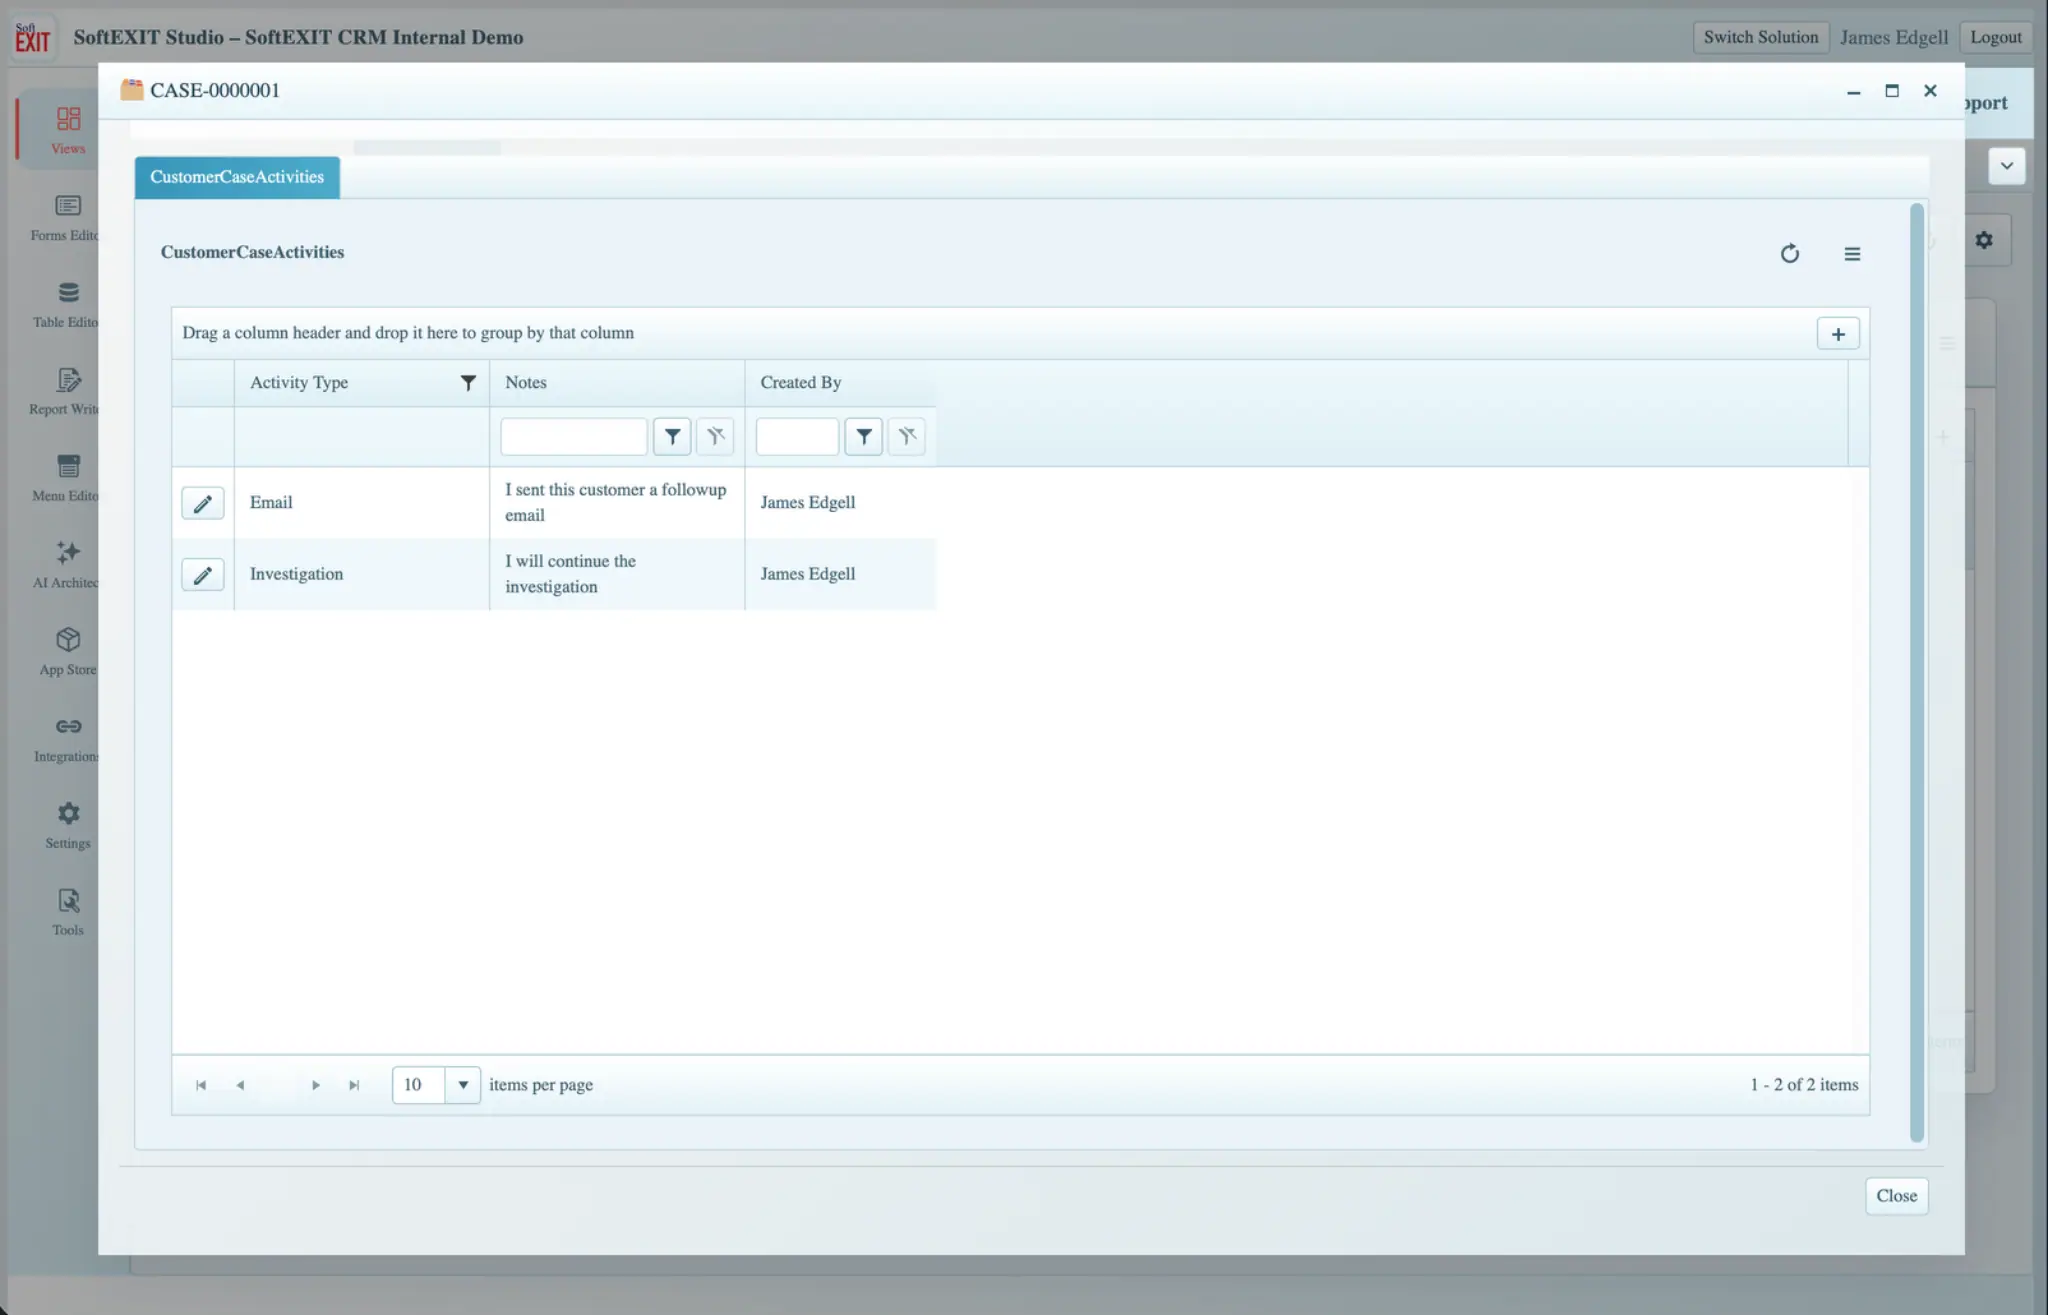
Case activity history helps teams understand what happened after an issue was opened. In the example, the case has a child Grid called CustomerCaseActivities, with activity types such as Email and Investigation, Notes, and Created By information.
Keep a useful service history
Open the case’s related activities, add an appropriate activity entry, and record a concise factual note. Over time, these entries create a traceable history of customer contact and internal follow-up. Use the Created By field to understand which user entered each item.
Work from My Cases
The My Cases tab displays a focused Grid of cases relevant to the current user, including case number, subject, contact, type, category, and priority. The example uses a component titled My Open Cases.
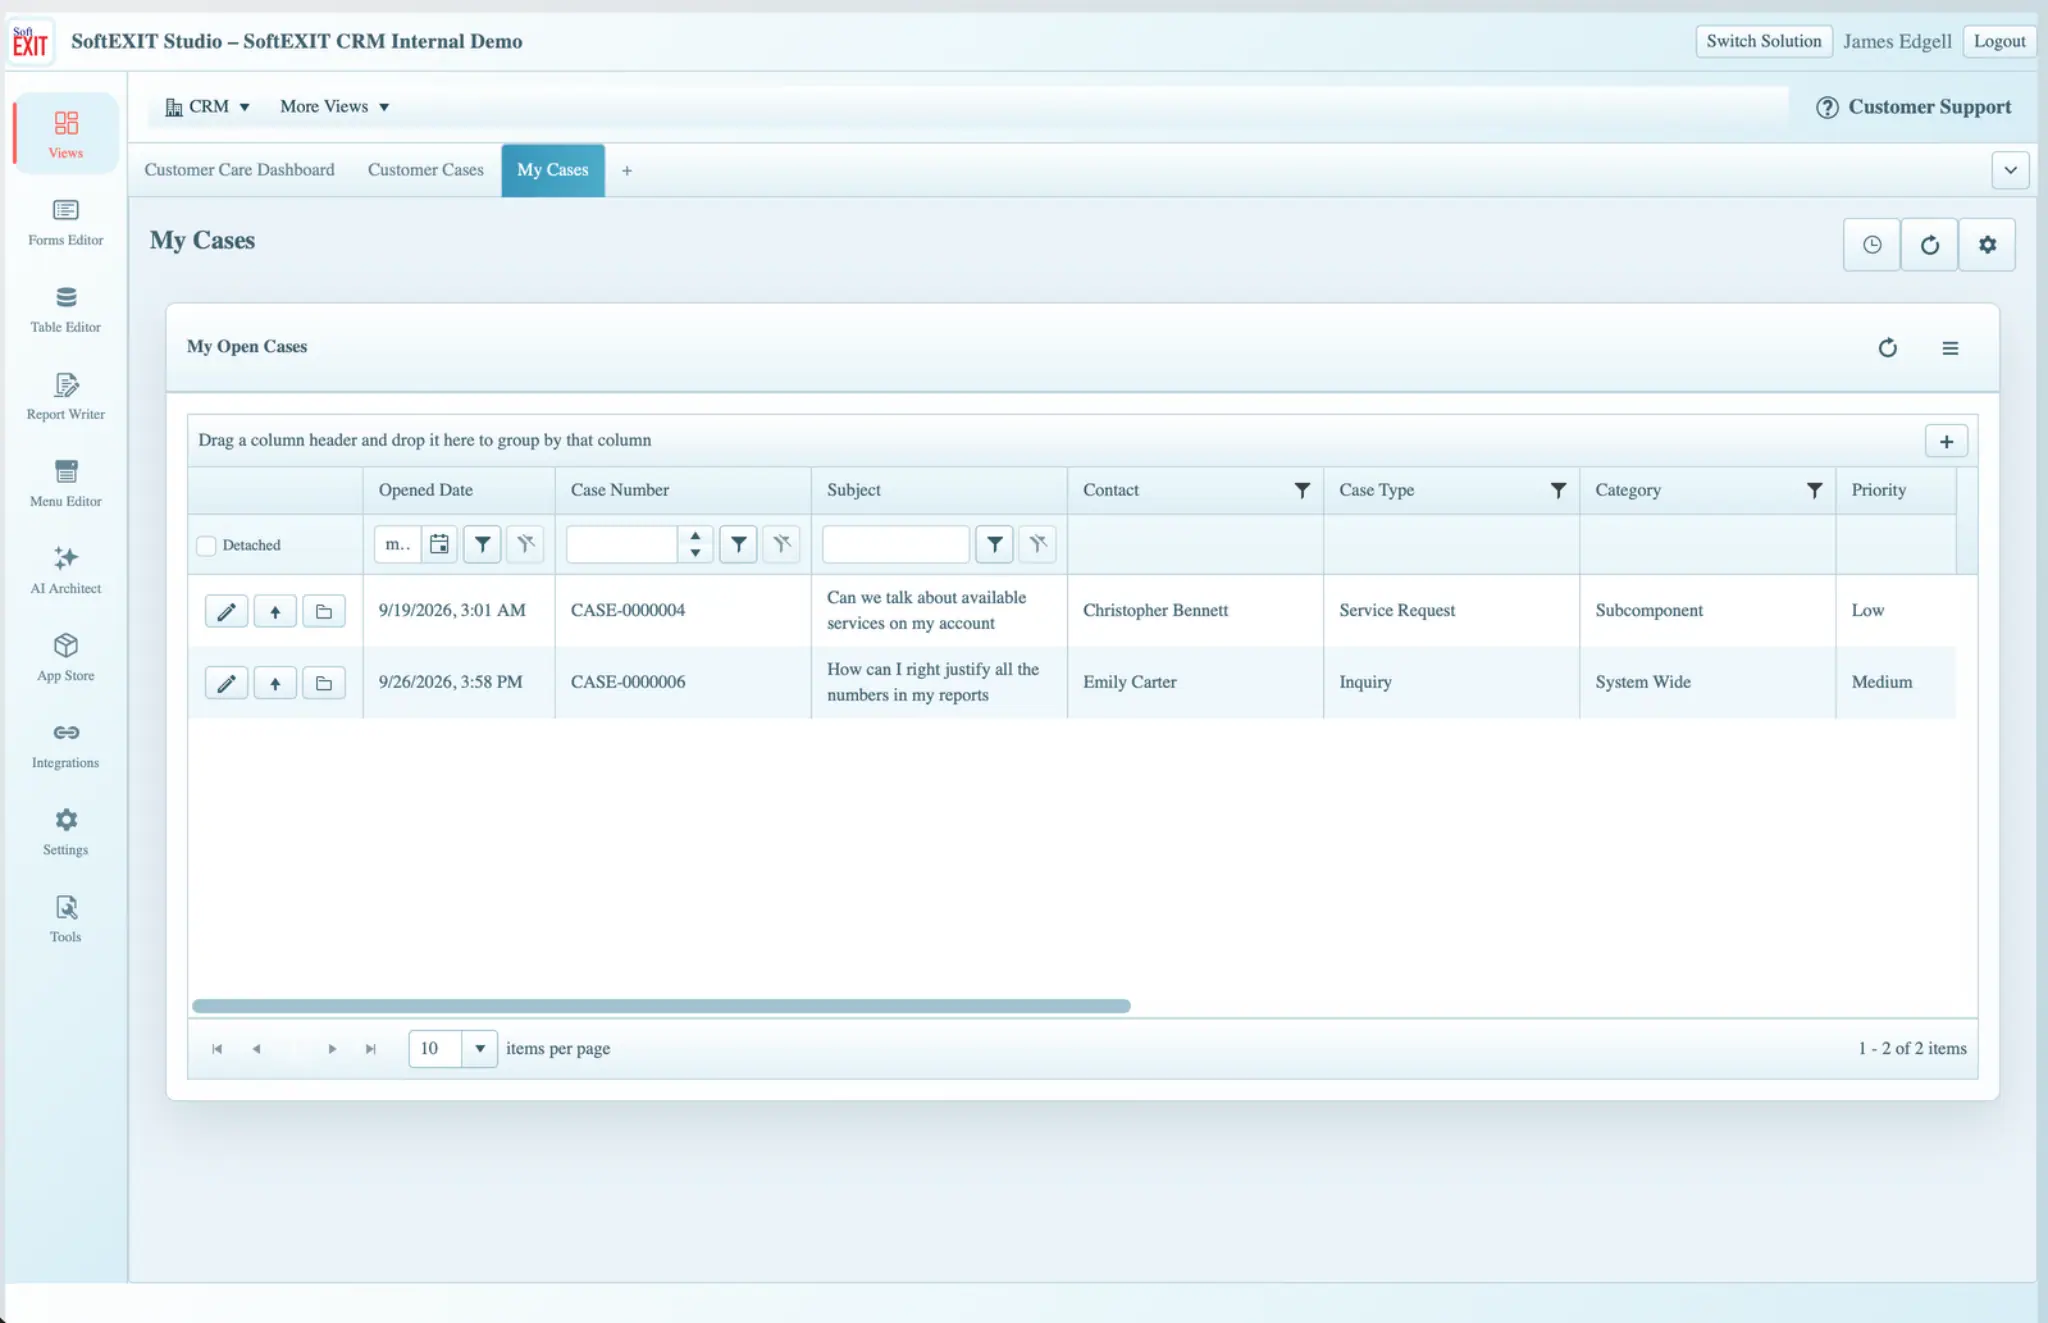
Review this view routinely, open cases due for action, and update their records. A case’s appearance in My Cases depends on ownership, filtering, and security configuration.
CRM Reporting, Integrations, and Administration
SoftEXIT CRM runs on SoftEXIT Studio, so organizations with appropriate permissions can extend it with additional fields, Forms, Grids, Dashboards, Reports, and business-specific views. Those design functions are different from the regular daily CRM workflow and may only be accessible to designated administrators.
Reporting and dashboards
For tailored reporting, Studio’s Report Writer lets authorized users select fields, apply filters, configure sorting and grouping, preview results, and export PDF reports. Charts, Gauges, and other View Components can be combined into dashboards that reflect the fields and records your organization has configured.
Integrations
Studio includes an Inbound API to receive authenticated external records, and eligible Professional organizations can use Zapier for supported record triggers and actions. For instance, an approved integration might create a CRM contact from a website inquiry or send follow-up details to another business tool. Configuration and access are controlled by the organization.
Go deeper
For application-building lessons, continue to SoftEXIT Studio Getting Started. For Zapier credentials, triggers, actions, and field mappings, visit SoftEXIT Studio Zapier Help. Verify the final URLs in WordPress before publishing.
First-Week CRM Checklist
- Explore the sales Dashboard and understand the opportunity funnel.
- Find a Company and inspect its Contacts, Opportunities, Activities, and Tasks.
- Create or update a Contact and verify its Company relationship.
- Record one real customer interaction as an Activity.
- Create a follow-up Task and assign its due date and owner.
- Update the stage and next action of an Opportunity.
- Review My Companies and check how the related Grids update.
- Open the Customer Care Dashboard and inspect a Customer Case.
- Add a case activity entry and revisit your My Cases queue.
- Review key filters, ownership, and access before relying on CRM reports.
Next step: Repeat the workflow with real records and agree on your team’s conventions for subjects, statuses, responsibilities, and follow-up dates.
Keep Your CRM Data Useful
Update contacts and opportunities consistently, log customer interactions, and follow through on the next action.